
Improving Website Performance
Programming · Apr 25th, 2021
Phew. That was quite a lot of information. Congratulations for making it this far 🎉
Now there is only one thing left to tackle: Performance.
If you remember all the way back, to the start of this blogpost, one of the reasons why I wanted to program a website from scratch, opposed to just using a website builder, is being able to get the best possible performance out of it. So, did writing it from scratch actually did perform better? No. Not in the slightest.
I mean, what did I expect? I jumped into this, knowing absolutely nothing about web dev. While my site may look nice in the end, it was so obvious that my website wouldn't perform good.
BUT there's light at the end of the tunnel. You are reading this blogpost on my page. At this. Very. Moment. And I am sure you can tell that it runs rather smoothly. Furthermore, if you go to the PageSpeed Insights (a tool by google to measure your website performance) of my website, you will see that it does have a pretty good result:
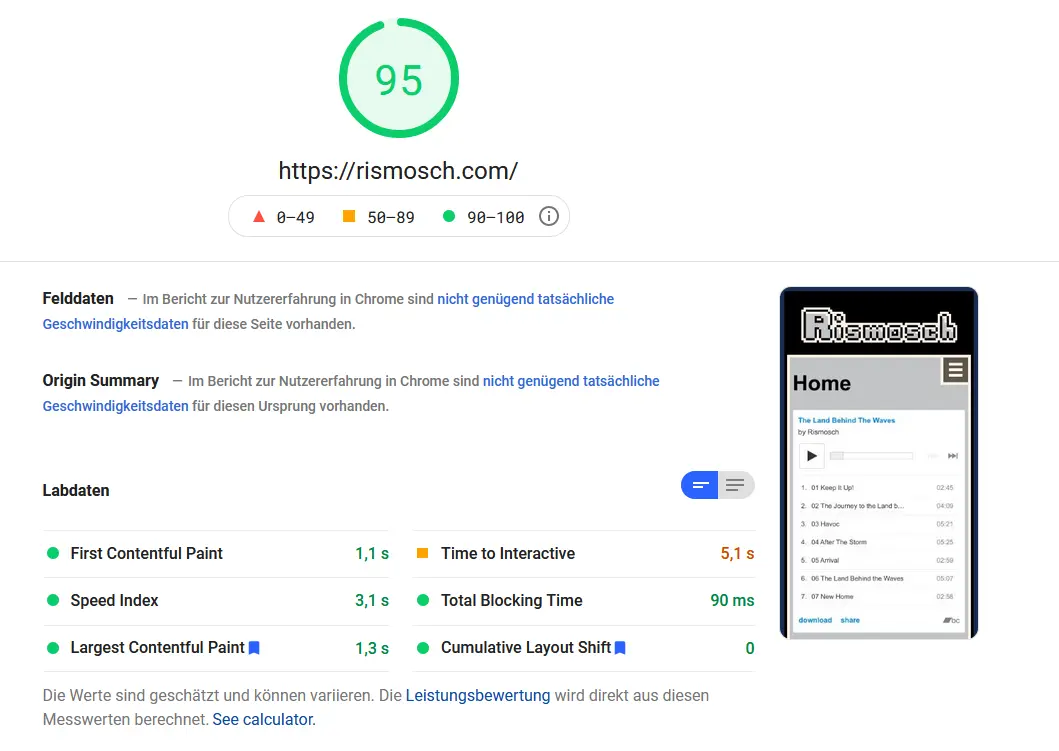
https://developers.google.com/speed/pagespeed/insights/?url=rismosch.com
The only reason why this isn't 100 points is because of that huge ass Bandcamp widget. If you take a look at a blogpost, it is full on 100 points:
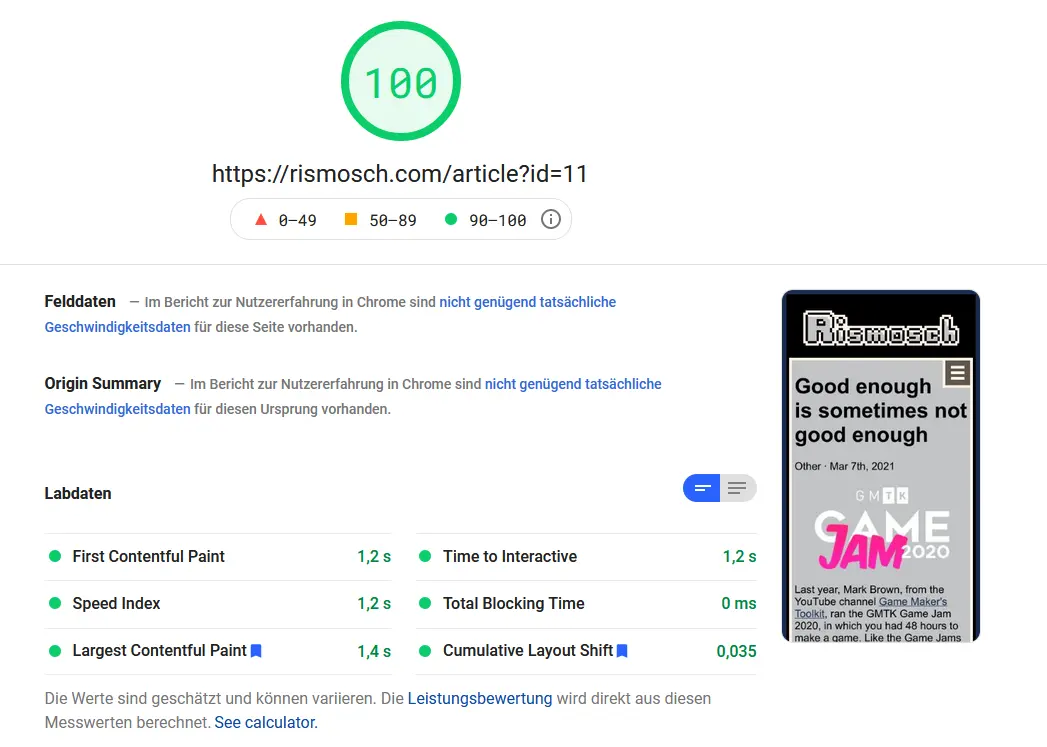
So how was I able to get such a good performance out of it? Well to make it simple: Another reason why I made the website from scratch is, to have full control over the whole code. So to get the best possible performance, all I needed to do was to apply all the tips that PageSpeed Insight told me and presto, I have a well-functioning website.
But this isn't as trivial as you might expect, which is why I am writing this last chapter.
Overhead
The very first thing you should do, is pack up all CSS, JavaScript and PHP files into one. While this may or may not be a good organization practice, it does help improve performance. You see, when files are requested and being send, not just the data itself is transferred. Each request and file are wrapped into multiple protocols, which contain header data, for example the sender and receiver identification, what type of data is being send, status codes, how large the actual package is and so much more. While this data is small, it can add up when multiple files are being transferred.
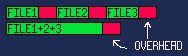
If you just have one big file, this header data is only required a single time, thus reducing the overall data being transferred and increasing performance. Such data is often called overhead, and it's desirable to reduce it. On a tangent note and fun fact, a similar issue arises when rendering with your graphics cards. Always batch render and reduce render calls as much as possible 😉
WebP
Another performance gain that is relatively easy to implement, is using the WebP image format. WebP is an image format by Google, which is able to drastically reduce the size of your images. Whatever you do, don't use paid internet services to convert pngs into webps; it's actually really easy to do it yourself.
More details and how to use it can be found here: https://developers.google.com/speed/webp
If this isn't easy enough to you, let me walk you through it. I am going to show you how to do it on Windows. How to do it on Linux or Mac, I leave it as an exercise up to the reader.
First, you head to this link: https://storage.googleapis.com/downloads.webmproject.org/releases/webp/index.html
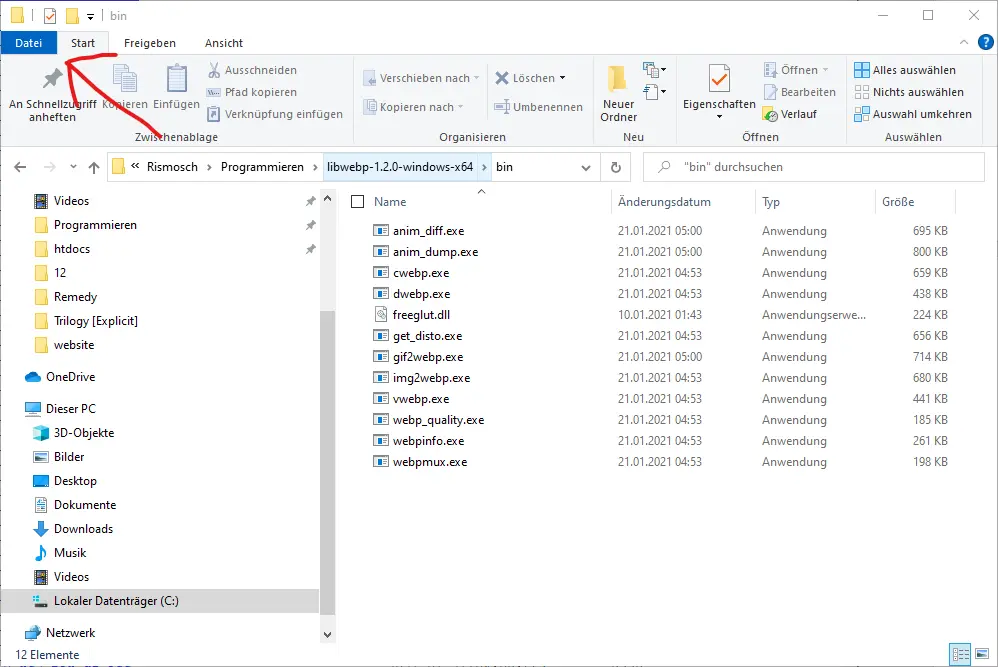
This is Googles download repository for precompiled WebP executables. You just pick the latest package for your operating system and the file format that you can extract, and then just download and extract it. Inside the package you will find a bunch of files:
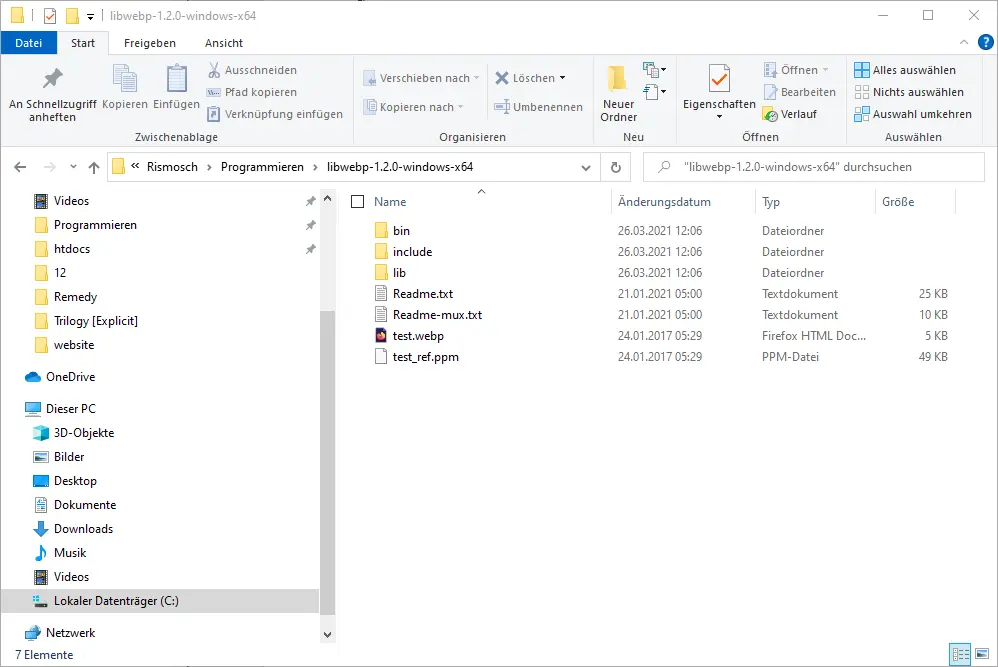
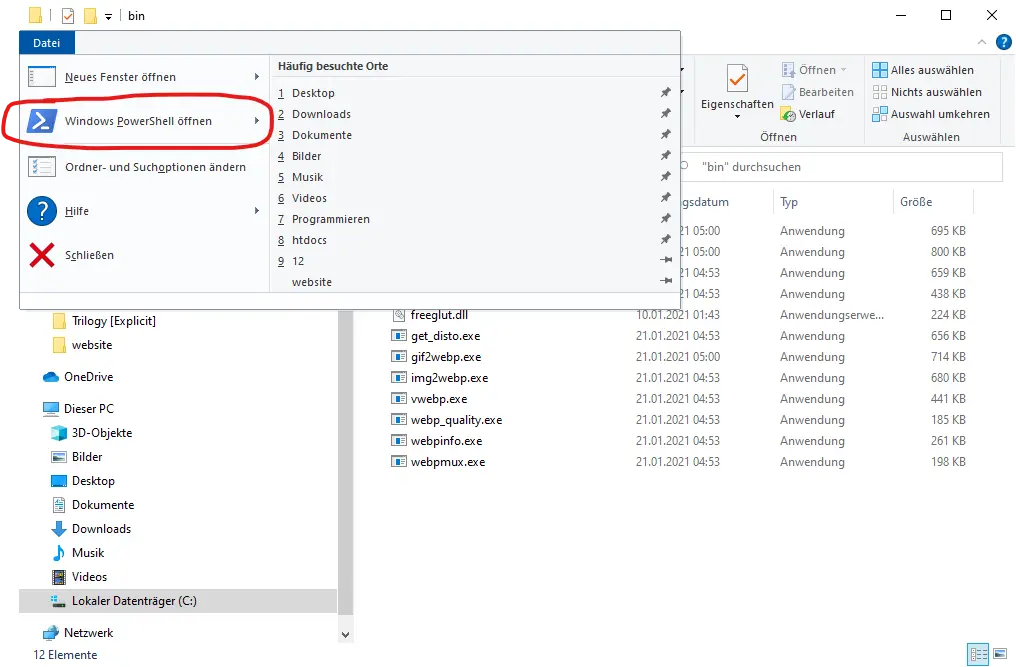
The interesting folder is the “bin” folder, because this one includes the program which can translate your pictures into WebP files. Head into the bin folder and click “File” in the top left corner. From the popup you should be able to open a blue console window, called the “PowerShell”.
In the PowerShell, you type in following command:
./cwebp.exe "<source file>" -o "<target file>"
<source file> is the image that you want to convert, for example a png or jpg. <target file> is the generated WebP file. Make sure that you include the whole file path with the file extensions. Also be careful of your target path, because the program will overwrite whatever target you choose.
An example could look something like this:
./cwebp.exe "C:\Users\Rismosch\Desktop\ugly_mug.jpg" -o "C:\Users\Rismosch\Desktop\ugly_mug.webp"
Press Enter and you should see the following thing:

Here's the result:
 |
 |
Left is the original, right is the WebP
They look awfully similar, but the original is 288 KB and the WebP 52 KB in size. This means the WebP image is about 20% of the size of the original, which is absolutely insane. Thanks to that original picture, which is about 40% of the transmitted data of this very page, chances are that this article loads a bit more poorly than the others 🙃
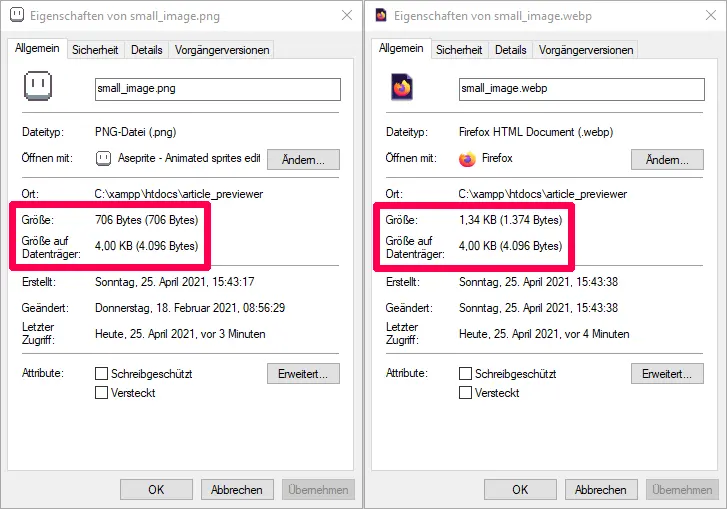
However, I don't recommend WebP for smaller pictures, like pixel art. I don't recommend it for 2 reasons: One, the compression ruins small pictures. And two, if the files are small enough, the added overhead of the compression will make the file itself bigger actually. For example, in the pictures below, I have the results and properties of a very small 75x42 picture. As you can clearly tell, the compression reduced the quality of the picture and ontop of that the WebP version is actually bigger. It's really a lose lose situation.
 |
 |
So, just use WebP for everything but pixel art.
Cached Resources
One thing to massively improve performance is to cache files. Your browser is able to save files, so when you visit a website, your browser doesn't need to request them again, thus massively reducing the files that need to be transferred. In my home directory I simply put a .htaccess file with the following content:
<filesMatch ".(css|jpg|jpeg|png|gif|webp|js|ico)$">

Header set Cache-Control "max-age=2419200, public"

</filesMatch>
What this basically means, when your browser requests a css, jpg, jpeg, png, webp, js or ico file, then my webserver tells it to cache that for 2419200 seconds (4 weeks). You can see the effect of this yourself when you head to a browser you don't care (like Edge for example), delete all browser data and then navigate rismosch.com. At first it takes a second or two to load each page, but once they were loaded, if you navigate back to them, they are loaded in a split second.
Loading Pictures Late
The most important image on every page, is my banner on top and its animation. Because I want this animation to be seen by everyone, it is super important that the sprite sheet will be loaded first. To guarantee that, I just need to load every other image later. Consider the following HTML:
<img

    src='data:image/gif;base64,R0lGODlhAQABAIAAAAAAAP///yH5BAEAAAAALAAAAAABAAEAAAIBRAA7'

    id='late_image'

    alt=''

>


<script>

    document.getElementById("late_image").src = "some_image.png";

</script>
The source of the image is literally the entire data of a 1x1 gif. Because the data is literally stored in the HTML, your browser doesn't request an image file. But once the HTML is fully downloaded and displayed in your browser, the script executes. It finds an image with the id late_image and replaces its source with the actual image URL. While this doesn't reduce the overall data transmitted, it makes sure that all other pictures are loaded after my banner spritesheet has been loaded.
To make the process so much easier, I've written following PHP code:
$img_sources = [];

$img_count = 0;

function late_image($source, $class, $style)

{

    global

        $img_sources,

        $img_count;


    echo "

    <img

        src='data:image/gif;base64,R0lGODlhAQABAIAAAAAAAP///yH5BAEAAAAALAAAAAABAAEAAAIBRAA7'

        class='{$class}'

        style='{$style}'

        id='img{$img_count}'

        alt=''

    >

    ";


    $img_sources[] = $source;

    ++$img_count;

}
Where I want the image to appear in the HTML, I just call late_image() with the correct source, class and style. It automatically creates this pseudo image tag. It also stores the URL for later. Then finally in my echo_foot() function, I have this piece of code:
global

    $img_sources,

    $img_count;


echo "\n<script>\n";

for($i = 0; $i < $img_count; ++$i)

{

    echo "document.getElementById(\"img{$i}\").src = \"{$img_sources[$i]}\";\n";

}

echo "</script>\n";
This generates the JavaScript to replace all URLs of the pseudo images.
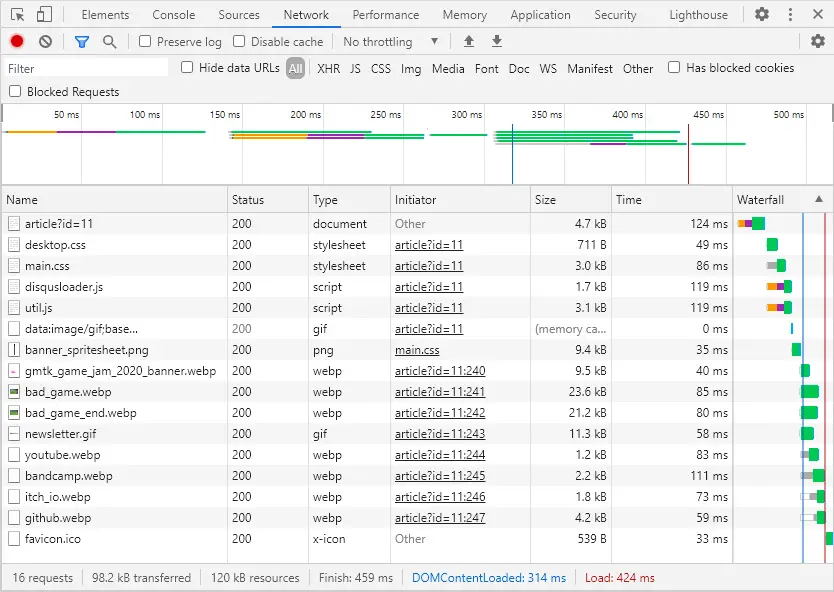
With using this for every picture, except the banner, all images generated by late_image() will be loaded late, except the banner. In the picture below, you see the network analysis of one of my blogposts. You see after the HTML and a bunch of CSS and JavaScript files are loaded, the 1x1 placeholder gif is the first thing to be "downloaded" and right after my sprite sheet. All other pngs or webps are loaded somewhere after.
Third Party Services
Now at the very end, take a guess which are the 3 least performant elements on my website. In no particular order, these are:
- The bandcamp widget on my homepage
- Disqus on every article and
- reCAPTCHA on my Newsletter and Contact page.
What do these 3 have in common? Right, these are all 3rd party services. The bandcamp widget makes more than half of the size of my homepage, the Disqus widget also is notoriously bloated and reCAPTCHA results in my newsletter-page to have the worst PageSpeed Insight rating out of all of my pages.
While I am definitely not popular enough to have people comment on my posts, I like to have the option, just in case. I don't want to go through the programming and privacy/legal hell of making a comment section, thus a 3rd party service has to be used. reCAPTCHA is also essential, because as discussed in the previous chapter, I want my collected data to be protected from bots. The only non-essential 3rd party service I use, is the bandcamp widget, which I only use because it looks cool. Depending on how old this blogpost is, the bandcamp widget is most probably gone already.
Disqus can be optimized a bit though, by just loading it when it is visible on the screen. I've used the disqusLoader from Osvaldas Valutis: https://css-tricks.com/lazy-loading-disqus-comments/
Their code makes it possible to only load comments, when the user scrolls down far enough. While the amount of data is the same, it improves the browsing experience, to not block the entire website when the user isn't even looking at the comments yet. Also, I have another trick up my sleeve: I display a message which hides the Disqus widget. It warns the user that Disqus does collect their data. If you don't accept that and don't press the button, Disqus literally won't be loaded. Thus, increasing performance by a lot and also preventing Disqus to track your data. That is quite neat.
These 3 services that I use are such a performance drain alone, I can't think of why someone would voluntarily use even more services, like ads or literally tracking your data. I made a bad habit of checking every single blog-post made on r/programming and check their size (I'm not even reading them lol). I am absolutely dumbfounded at the size of some of these blogs! I mean dude, your blog has 500 words and 3 pictures, how the ♥♥♥♥ is it 2 MB in size?! But well, the best I can do is silently judge people for their bad performing websites and feel intellectually superior to them /s
The End
So, at last you have reached the very end of my little blog post. I hope you found it entertaining and learned something from it. Obviously, I skimmed over so many details, but it should've given you a good overview of all the stuff that you can, need or should do when you make a website completely from scratch.
Was it worth it though? Well, it definitely took me a lot longer than I expected. The repository on GitHub may tell you that I needed 2-3 months to code the website, it actually took at least twice as long, because I accidentally pushed my private reCAPTCHA key and database passwords multiple times, which is probably a bad idea when strangers on the internet have access to these things. So I had to nuke the repository multiple times.
I learned a lot from it though, more so than I learned in college. Pulling up a project like this in the real world is actually quite a bit different than running a website in the simulated servers of a school. I can recommend that you write your own page from scratch, because it is a good learning experience, but be aware that it takes a lot of time and work.
Thanks for reading and have a good day 😜
|
| ◀ | Previous Post: Newsletter, Collecting Data and reCAPTCHA |
| ▶ | More Programming related Posts |