
Rebinding Controls via a RebindMatrix
Writeup · Jul 11th, 2022
Every now and then, I see a post pop up online, discussing why there are many games that don't implement rebindable controls. And usually, the problem is swept under the rug with the answer "well, it's just too difficult." Actually, in this blogpost, I am trying to prove that it's not.
Every problem in computer science can be solved with a level of indirection.
Professor Jay Black of the University of Waterloo · Quote taken from: "Game Engine Architecture" by Jason Gregory, Third Edition, page 585
Ideally, your game does not care what controller is plugged into it. No matter if the controller is made by Microsoft, Sony or Nintendo, if it's a microwave or a banana. The player may want to play with any controller. You want to program against an interface that abstracts the inputs of the controller. What lies between the controller and this public interface, is your rebind system
The rebind system I am proposing here, is somewhat original. Or at least, it's so uncommon in games that I couldn't find it via a quick google. So even if you have a working rebind system in place, this blogpost may still be interesting for you. The system I am proposing is both easy to use, but also stupidly powerful, so buckle up!
Inspiration: Synthesizers
First, I want to talk about synthesizers for a bit. You will see in a second, that synthesizers have a similar problem regarding rebindable controls. And I think it's worth discussing synths and the solutions they came up with, so that you can better understand my proposed solution. Synthesizers are quite a bit older than video games. The synth people had much more time to solve this issue than any video game dev. I just let myself be inspired. If you are a fellow synth nerd, you may find the following sections to be a bit oversimplified, but know that I primarily want to get the point across. If you have no idea about synthesizers, then don't worry, I will hand you along safely.
A synthesizers sound is dialed in via its various knobs and buttons. But once the sound is dialed in, it is more or less static. By that I mean, no matter how you press the key on the keyboard, the sound will always sound the same. That is somewhat lame, especially if you compare it to a guitar for example. A guitars sound can be modified quite a lot, depending how you strum it and how you finger it. For example, if you strike the strings strongly, you get a louder sound as if you just brush them lightly. Or when picking a single string, you can move the finger that is holding the string up and down, creating a pitch shift or vibrato. Thus, the guitar is quite an expressive instrument. The synth however, is not.
This is where modulation comes in. Sooner or later, synth people realized that the strength of how hard a key is struck can be measured, and this signal can be fed into the amplifier, thus making the sound louder or more silent. How hard a key is hit is often referred to as velocity. Or you could make a vibrato-like effect, by using a slow-moving wave, that changes the pitch slightly. Such a slow vibrato wave is usually called LFO, standing for Low Frequency Oscillator.
However, what if you want to be a bit more artistic? Maybe a pitch vibrato is boring. You want the vibrato to go to the amplitude of the sound instead. This would make something like a wah-wah-wah sound. If you are familiar with guitars, the tremolo-effect pedal works exactly like this. Or maybe you want the pitch of the sound to change, the harder you hit the key. This may be a little unconventional, but if you really want something like this, you need a rebind system. Things like LFO and velocity are called modulation sources, and things like pitch and amplitude are called modulation destinations, because the former can modulate the latter.
The oldest synths where modular, where a single module would have a single function. So you would have one LFO module, one velocity module, one pitch module, one amplitude module, and you would connect them with cables. So, if you want a pitch-vibrato, you would patch a cable from the LFO to the pitch module. If you wanted an amplitude-vibrato, you would patch a cable from the LFO to the amplitude module. This gets the job done, but a lot of cables can get very messy very quickly. If you are a touring musician, such cables would only be a hassle, especially if one or more cables where to be unplugged accidently! So another solution was devised.
Instead of using external cables to connect modules together, you would have all modules on a single circuit board and have them connected internally. Then with a switch, you can simply change where the modulation is being routed to. This avoids all messes, but it's quite limiting. Because now, the LFO can only go to either the pitch, or the amplitude, not both. If you tried to implement a switch for every single routing, you would end up with so many switches, that it becomes unpractical.
Some synths tried to find balance between cables and switches. On one hand, they wanted the absolute freedom to patch every modulation source to every destination, but on the other hand the compactness of cable-less synths. And they came up with the ModMatrix. The idea is simple: On the left side, you have modulation sources, and on the top, you have modulation destinations. A source is routed to a destination, if the cell they both cross is activated. If the cell is not activated, the source is not routed to the destination.
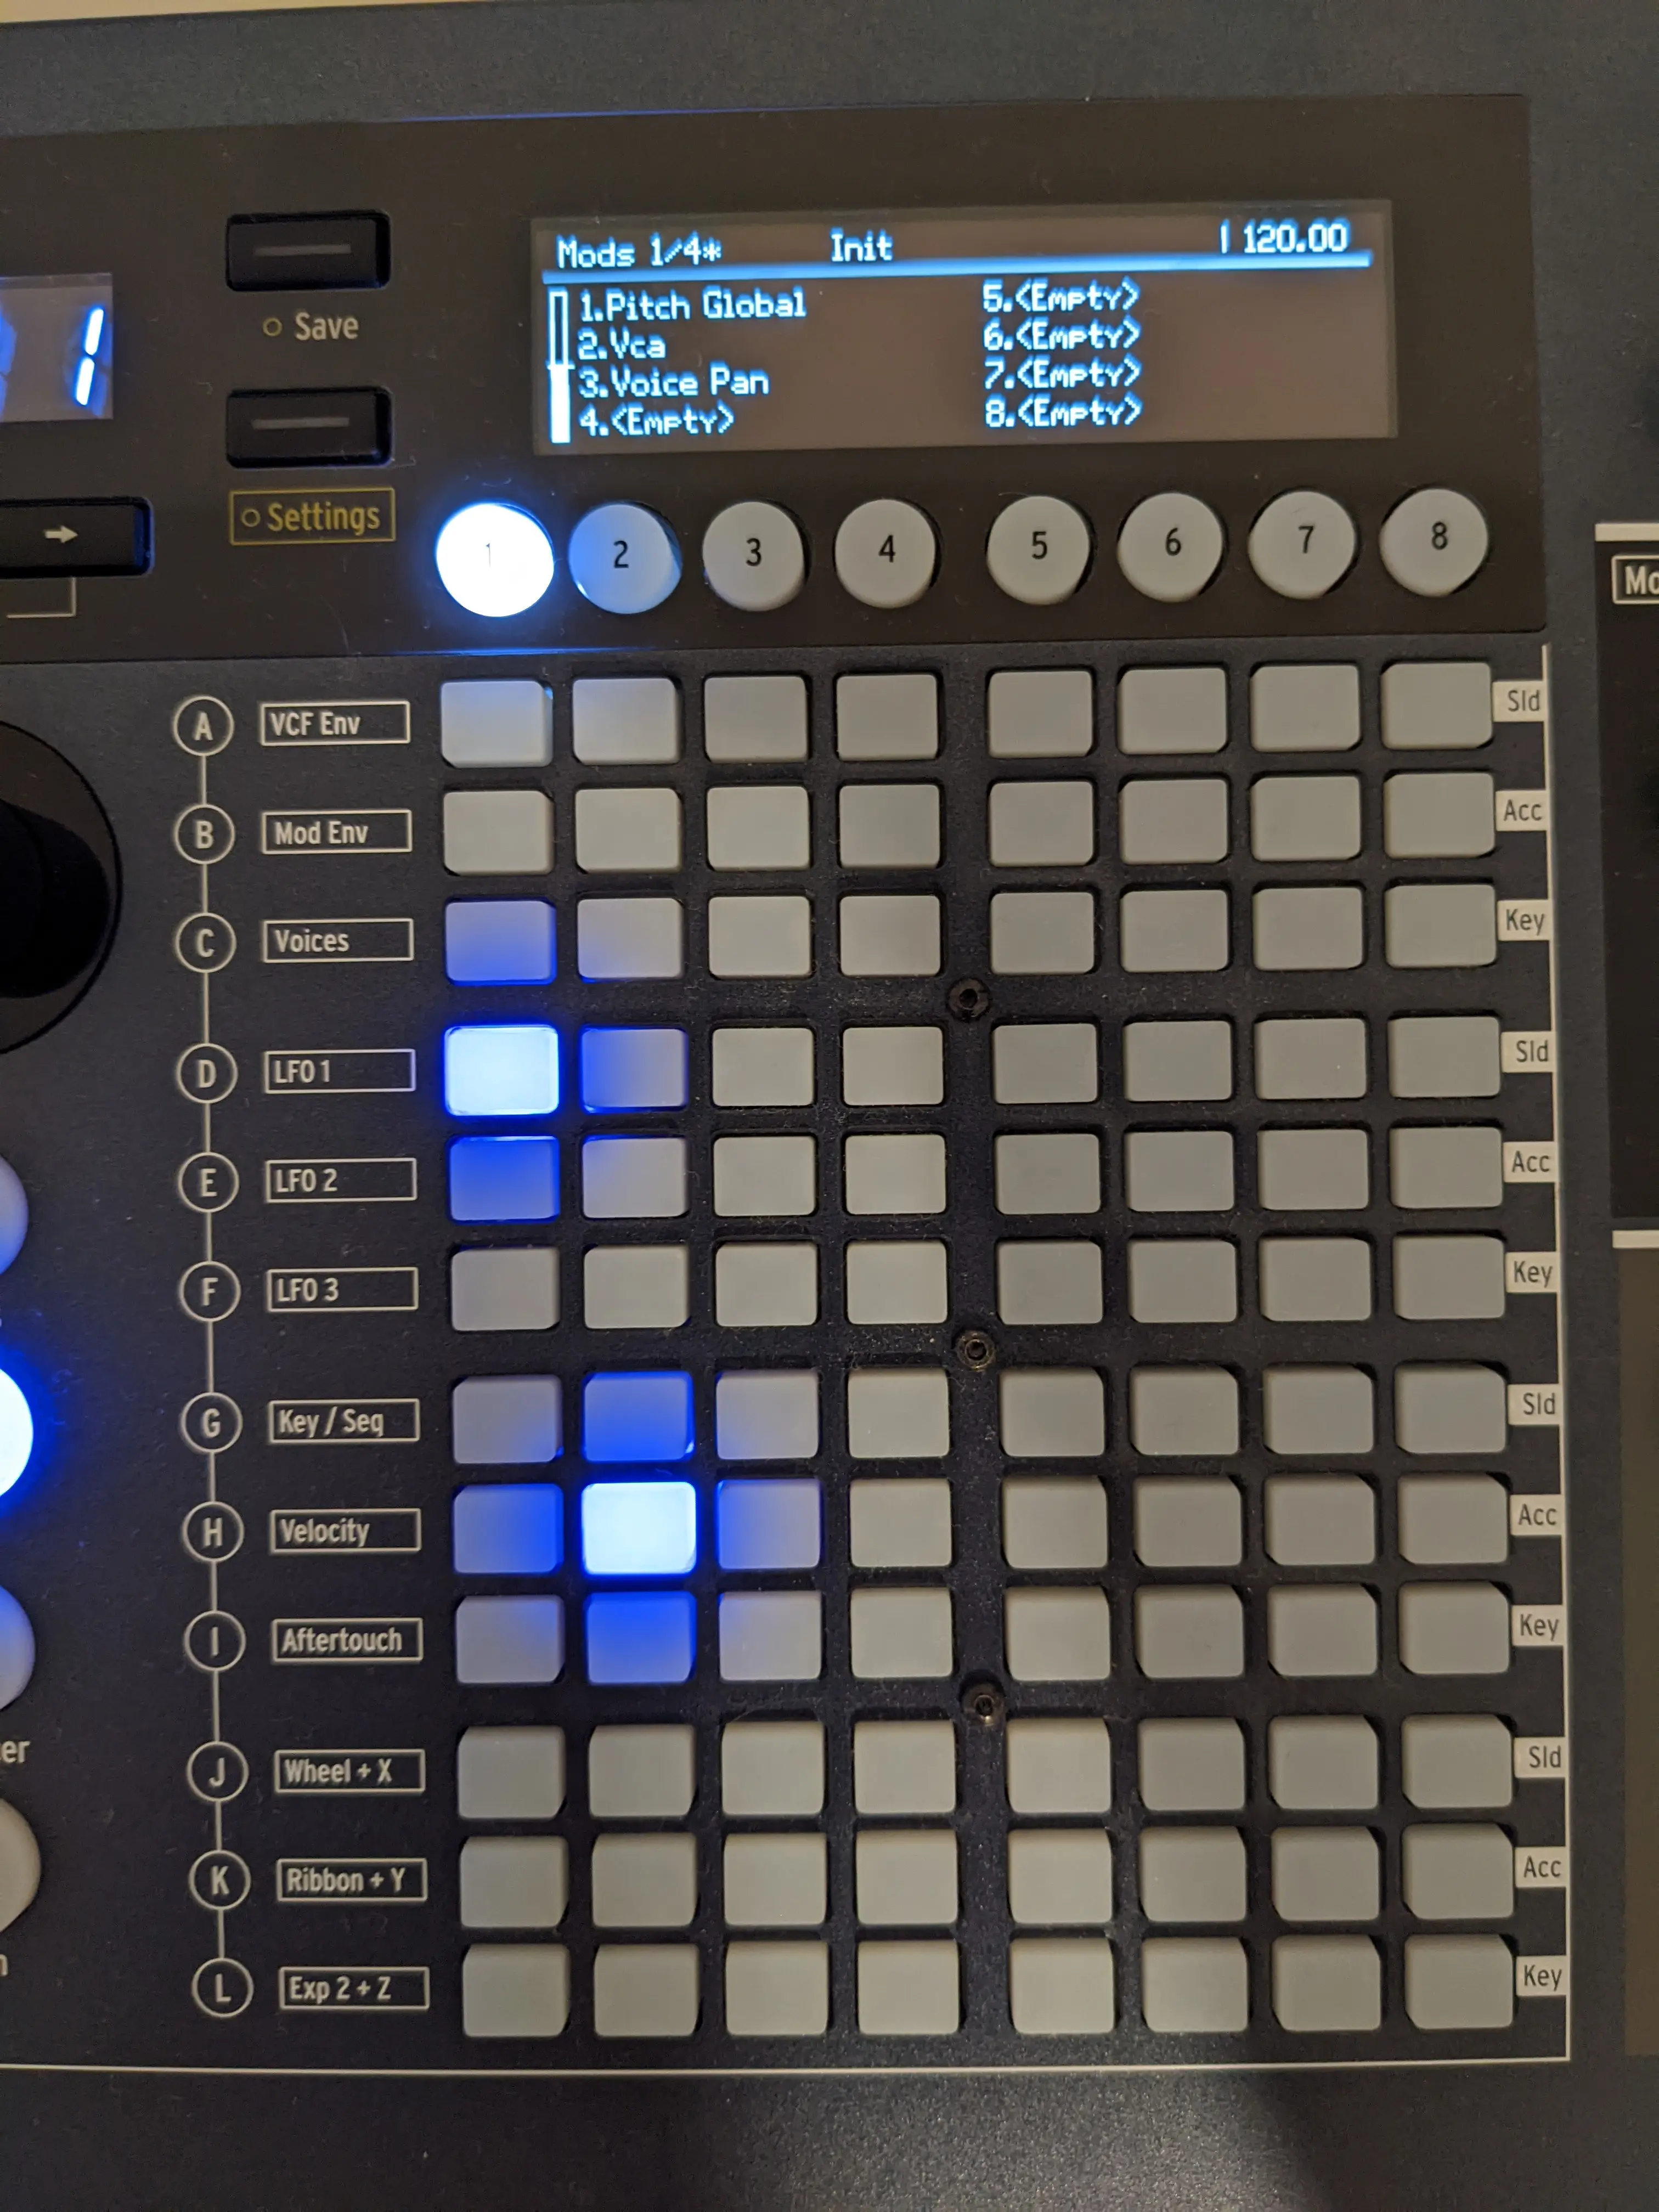
The image above is a picture of the ModMatrix of my Arturia PolyBrute. A cell is activated if it is glowing blue. In the picture above, you see that LFO 1 is routed to (1) Pitch Global and Velocity is routed to (2) Vca (for our purposes, simply think amplitude). I added some arrows in the picture below to highlight it better:
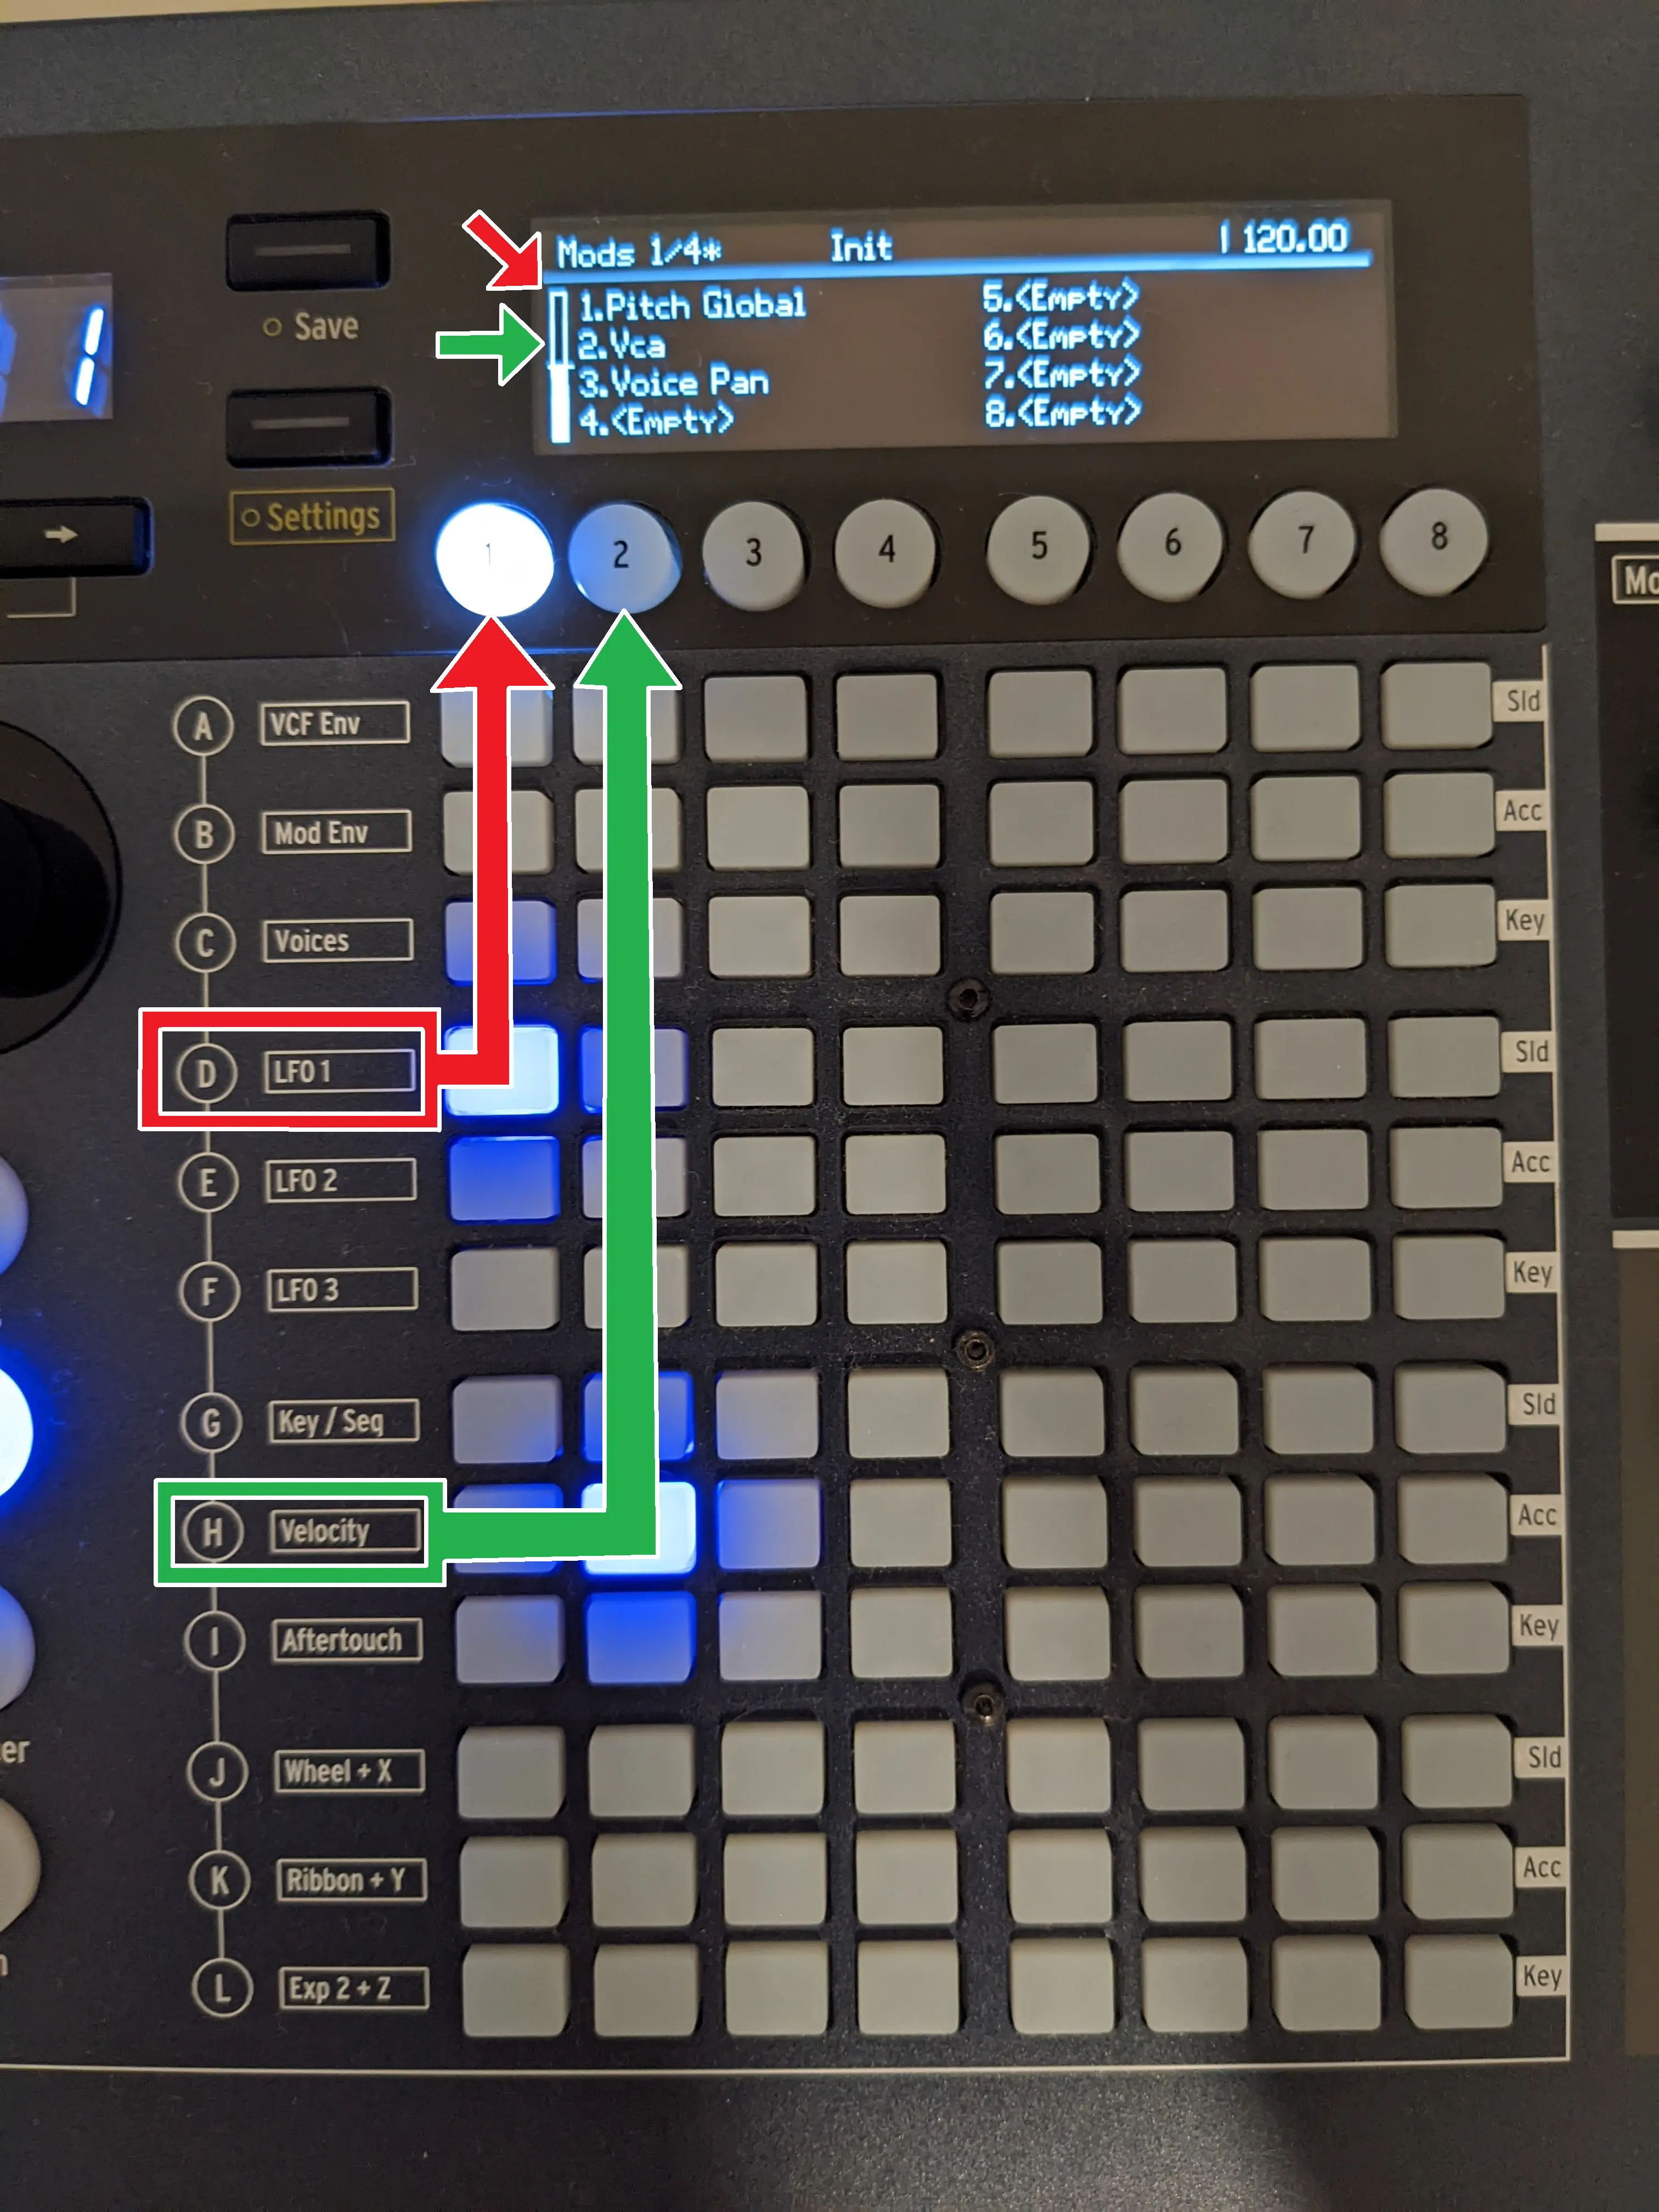
Okay that's cool and all, but what if two cells are active in the same row or column? Well, if cells are in the same row, this one modulation source is routed to multiple destinations. If the cells are in the same column, then all these modulation sources are routed to the same destination.
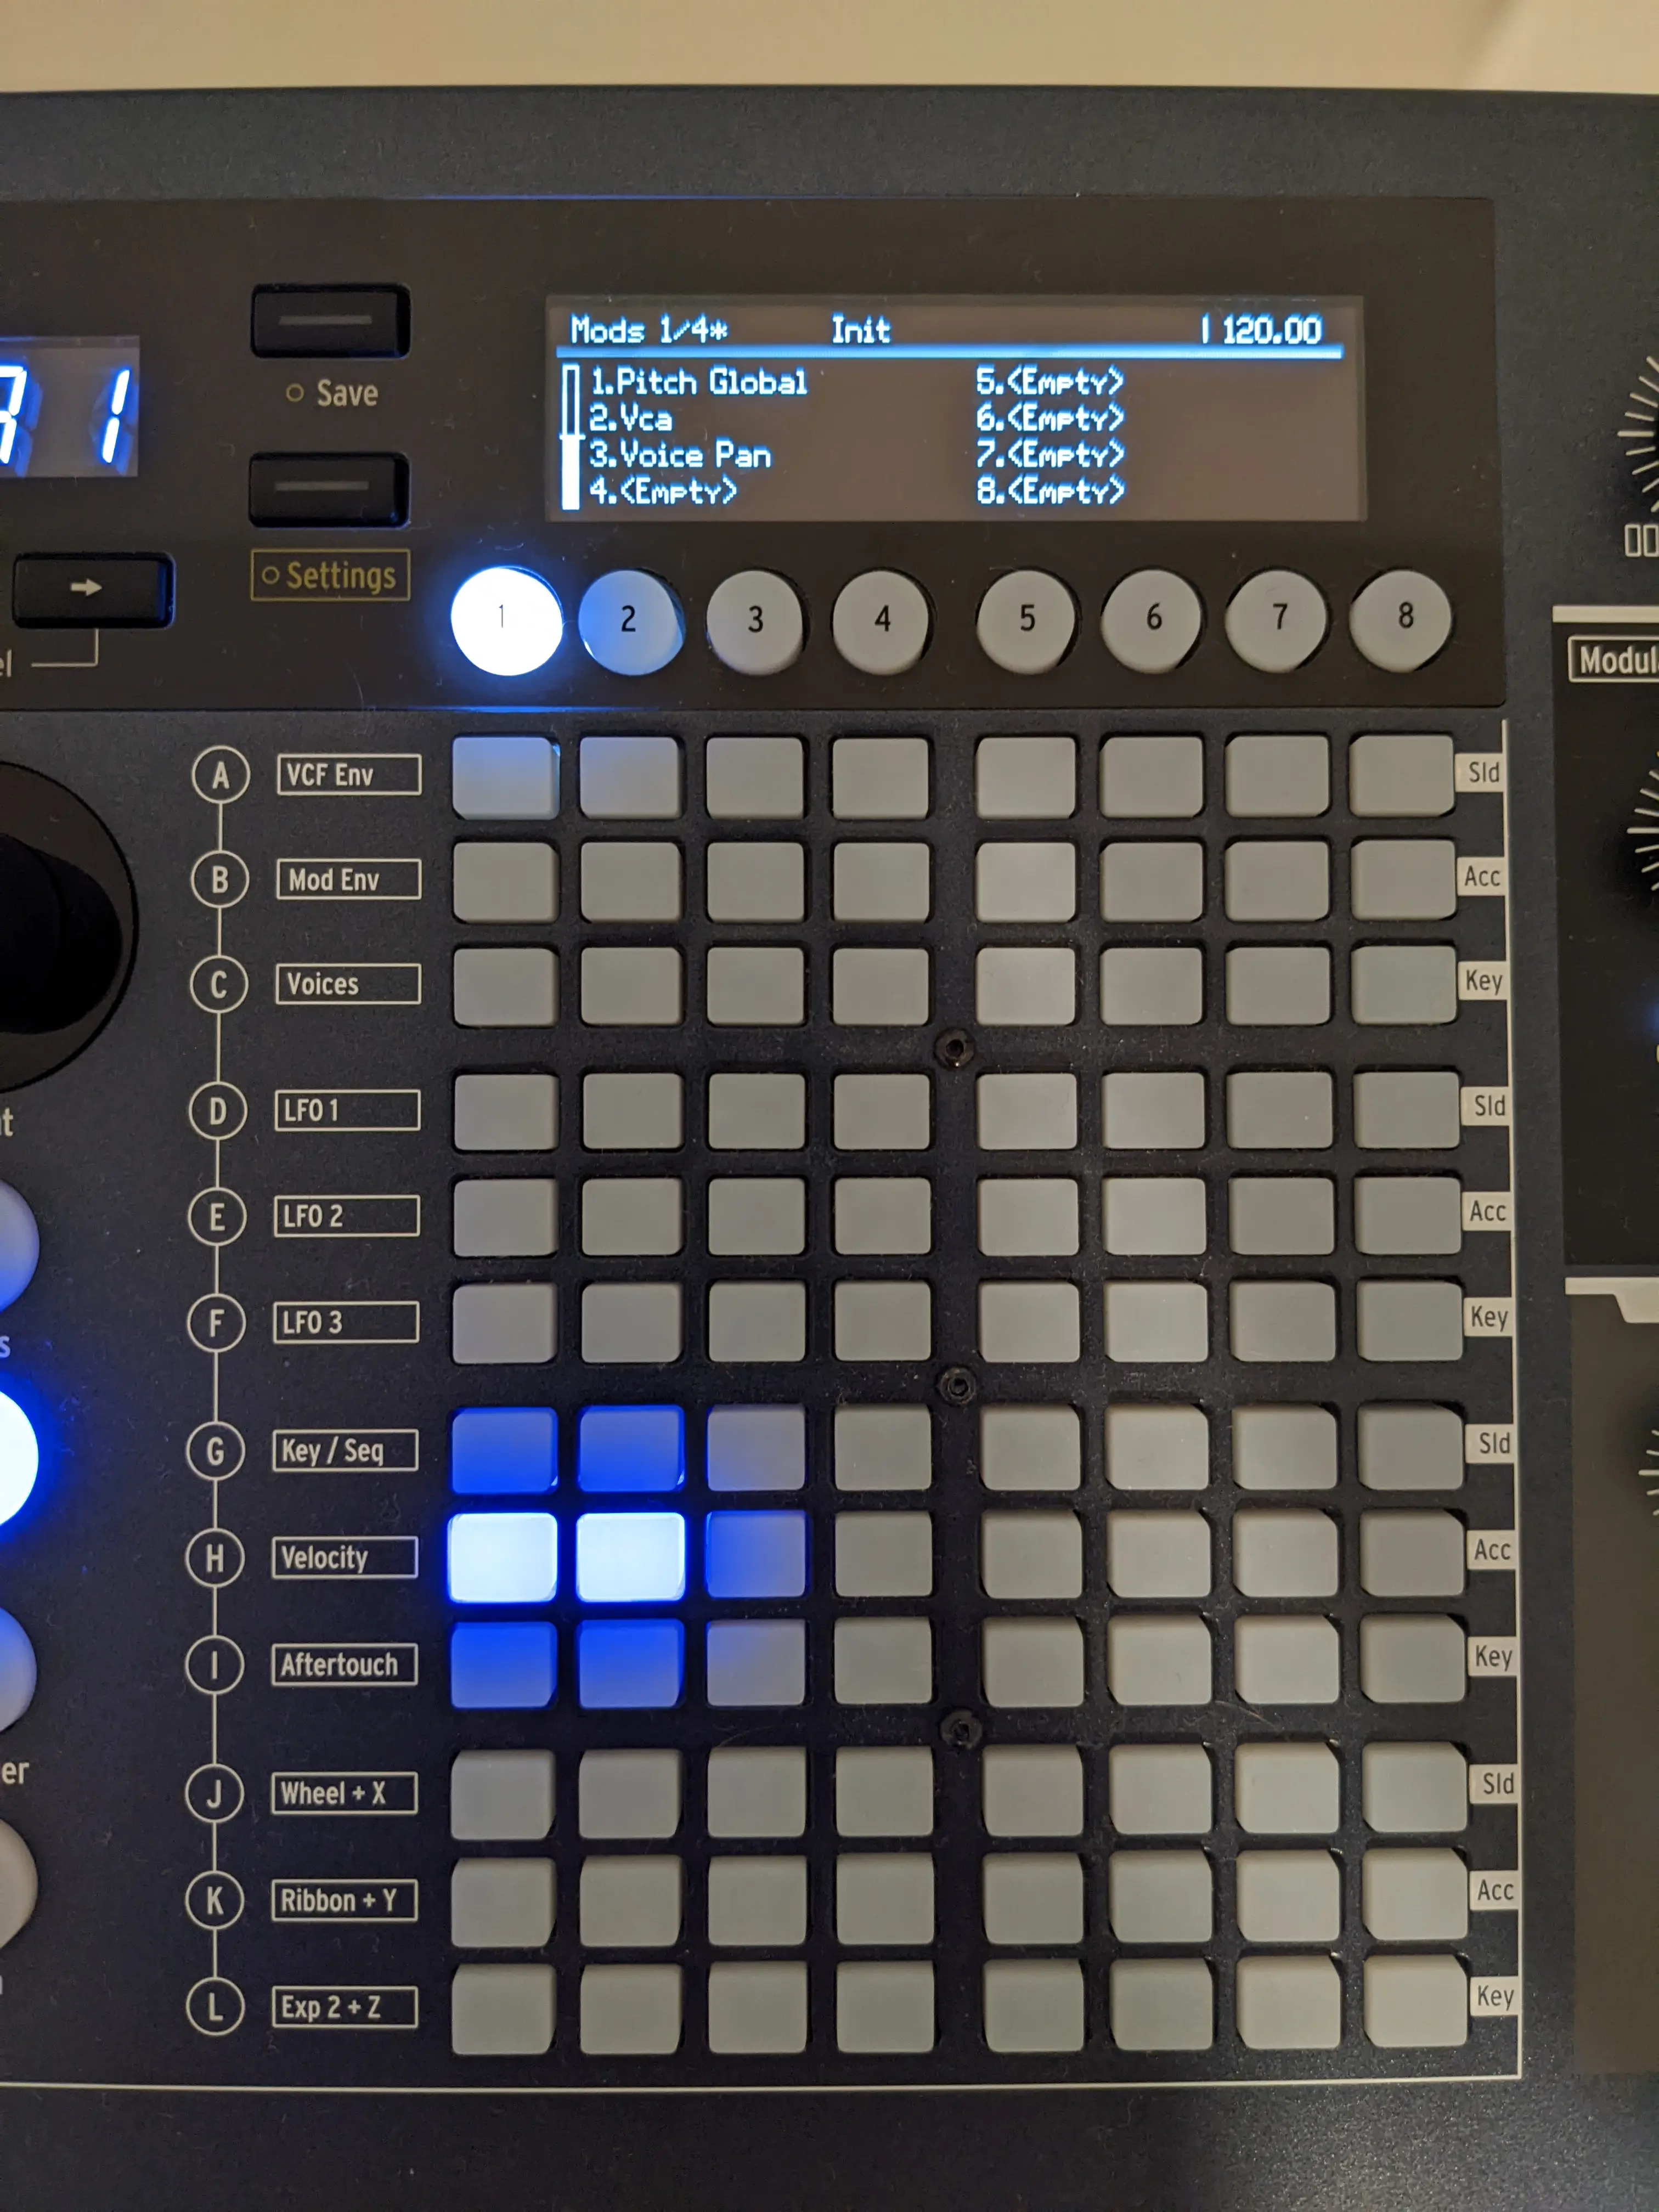
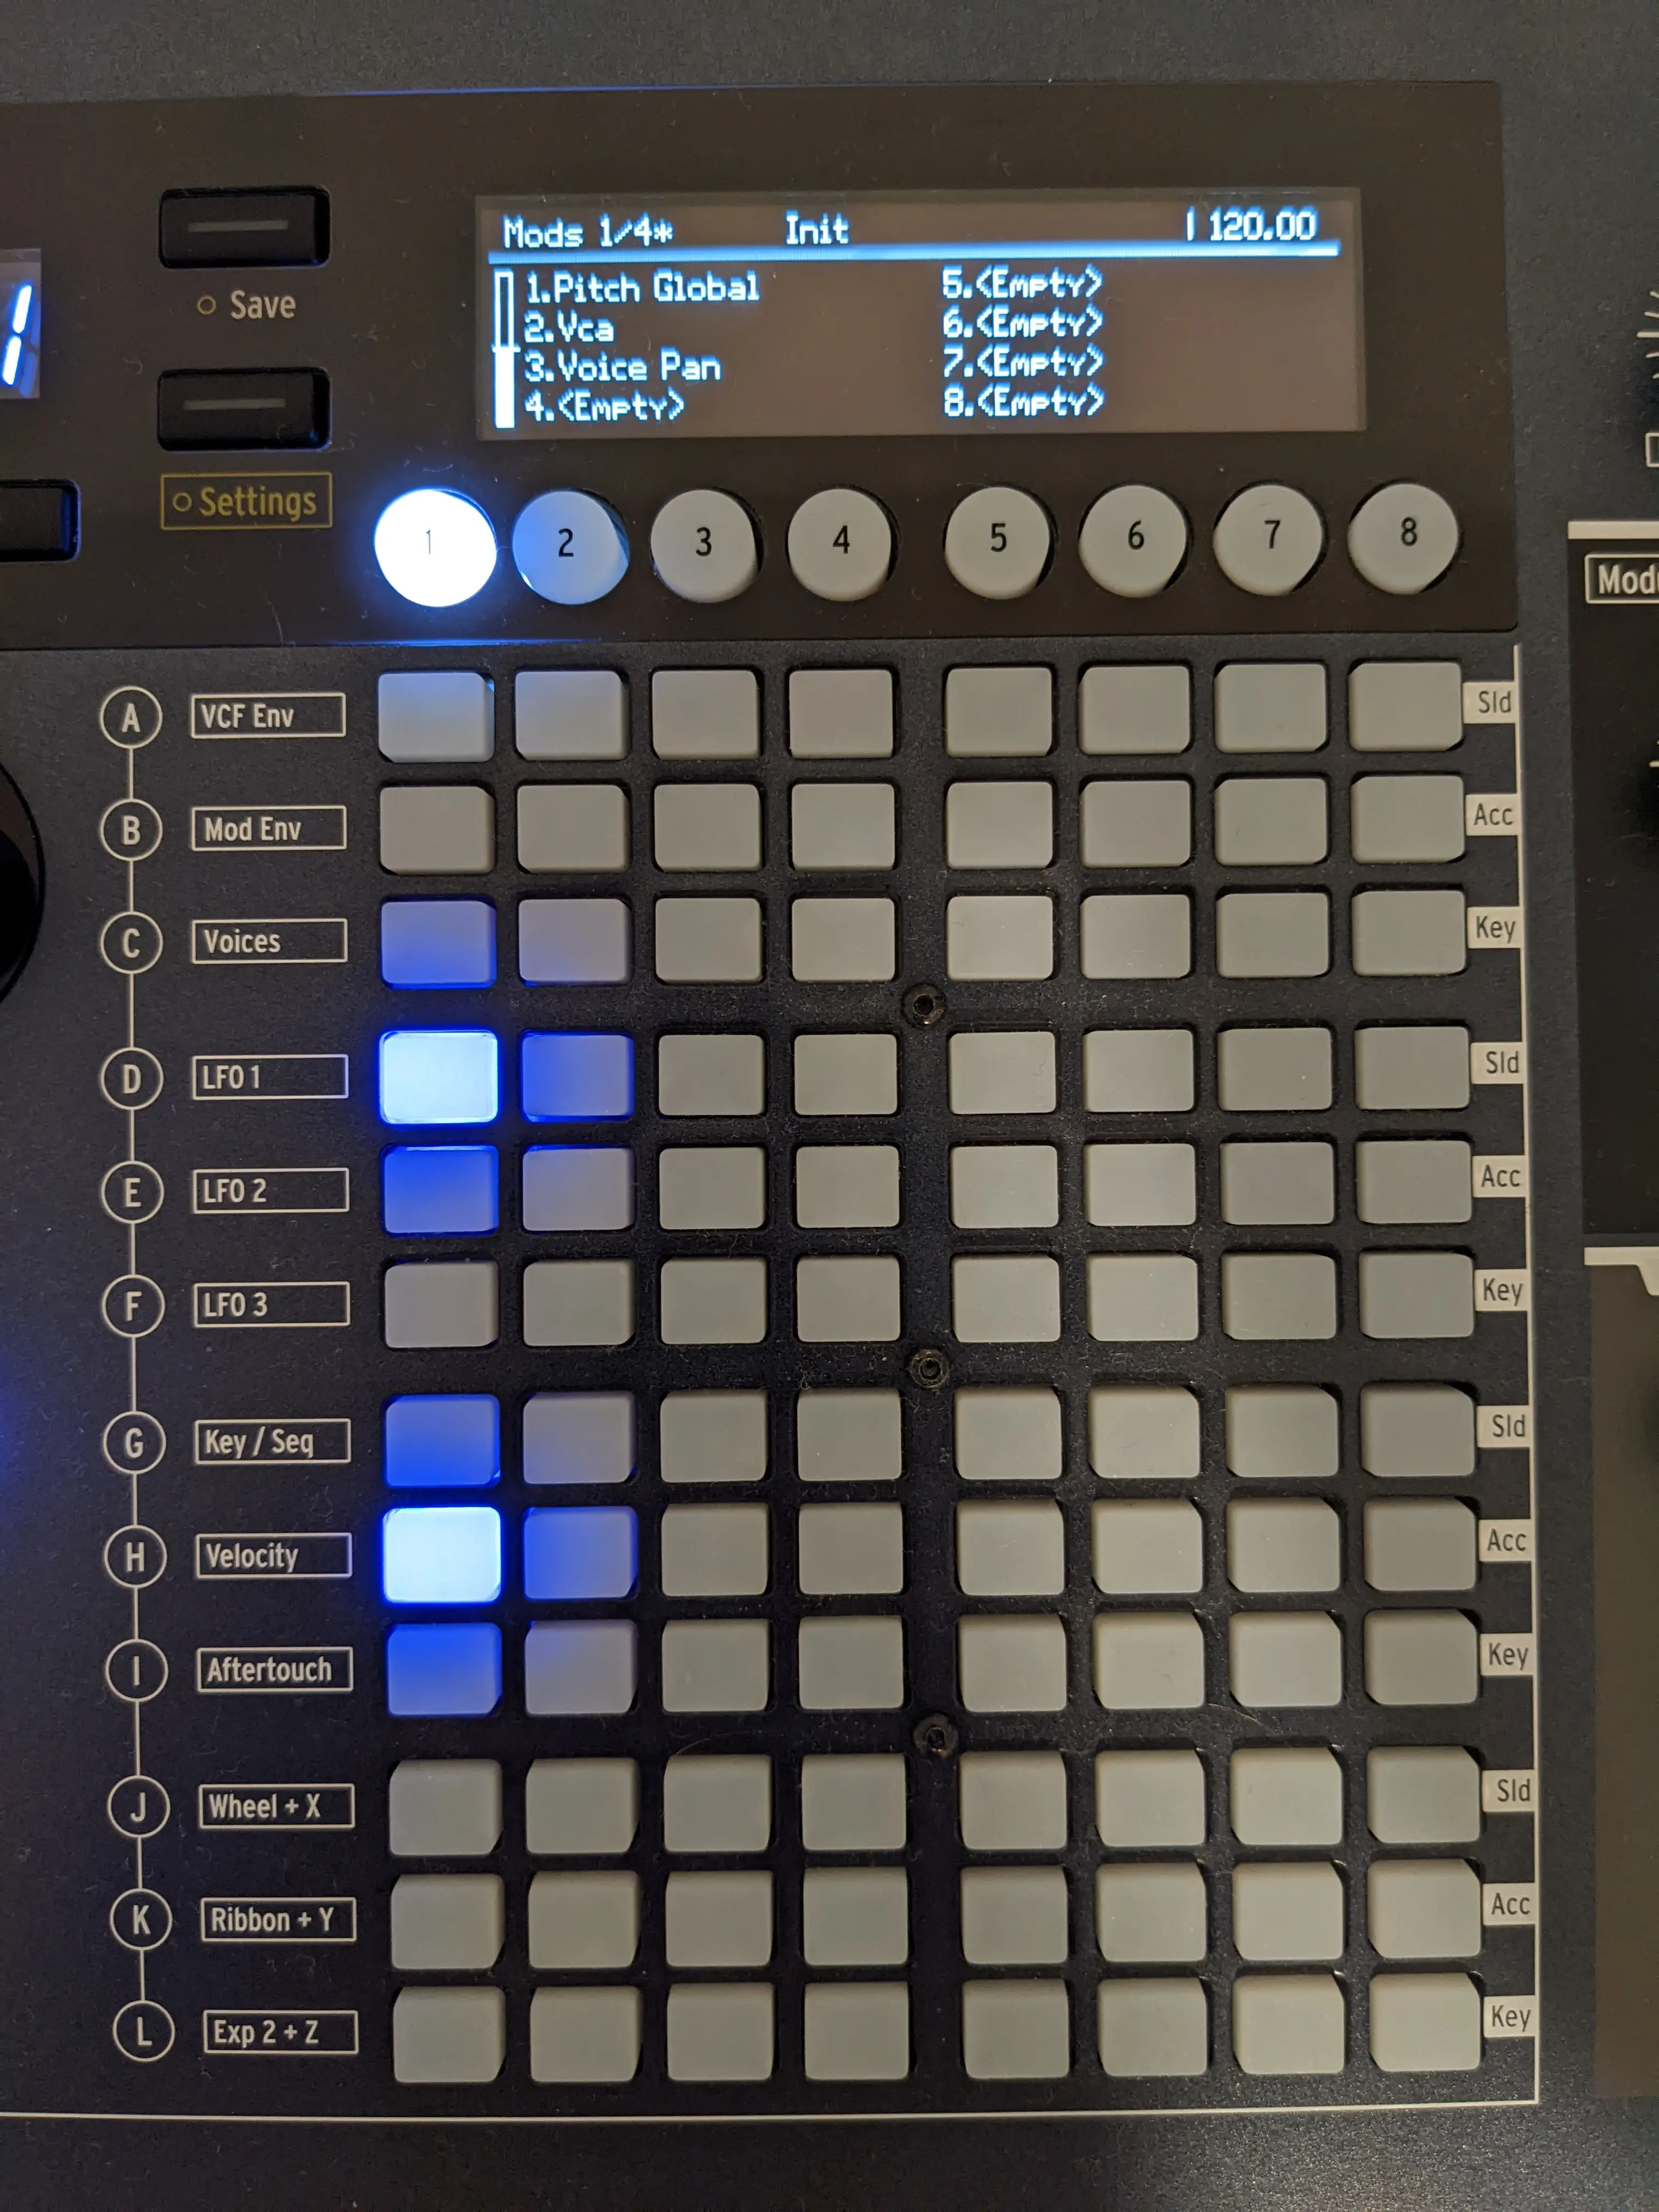
In the picture above, Velocity is both being routed to (1) Pitch Global AND (2) Vca. And in the picture below, BOTH Velocity and LFO 1 are routed to (1) Pitch Global (think of it as logical OR).
The naïve solution
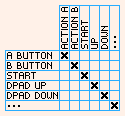
So hopefully you understand the basics of a ModMatrix now. And maybe you know already how this applies to our rebind system. On the left of your RebindMatrix, we have the actual controls that come from our controller. And on the top, we have the interface that our game programs against. To route an actual control to the interface, we need to activate that specific cell.
How do we actually program this?
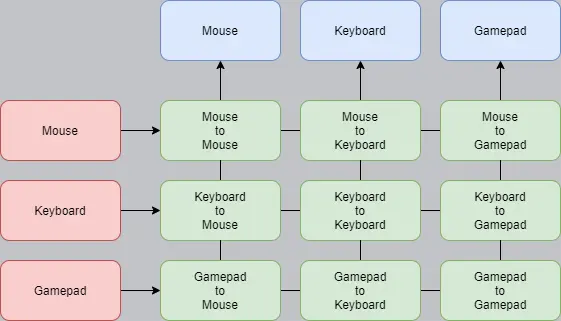
At first, I wanted to make an all powerful rebind matrix. Meaning every button of every controller maps to every other available button. After implementing the keyboard controls and starting with the mouse, I've realized that this may not be a good idea. That is because in SDL2, the mouse, keyboard and gamepad are similar, but not quite the same. Thus, I didn't just need a RebindMatrix from keyboard to keyboard, and mouse to mouse, but also mouse to keyboard and keyboard to mouse. Things get even more hairy with the gamepad. I needed unique logic, for every single RebindMatrix. This doesn't scale.
Disaster struck when I decided to remove the sleep statement in my main gameloop. You see, at this point of development of my engine, the console output is literally the only thing that I can interact with. Primitive, but it works. And to better read the output, I use a sleep statement to slow down the loop. When the sleep statement is removed, the loop is able to run at full speed. When I removed it, I was shocked to discover, that the loop ran about 300-400 fps. As a gamer, this may sound amazing to you, but for me it raised huge red flags. Literally everything my gameloop was doing at this point, is some event stuff, framebuffering and control rebinding. This is relatively nothing, and yet I only get a couple hundred fps. This is bad. Real bad. This was before I even started implementing the gamepad. So I went back to the drawing board.
✝Footnote: If you are curious how performance could be that bad, my initial naïve implementation made heavy use of hashmaps, that mapped keyboard buttons to bools, and which were iterated one too many times. Due to the sheer amount of keyboard buttons, other simpler data structures didn't seem feasible at the time. But in the following sections, you will find a correct implementation, which uses integers, utilizing bitwise operations.
The correct solution
I was reconsidering what I actually needed from this system. The game that I want to make is still a vague, distant dream with loose goals and blurred requirements. But one way I want it to be playable is in a living room, sitting on a couch in front of a TV and a gamepad in my hand. This means, that the entire game has to be playable with a single gamepad. So I asked myself, is it absolutely necessary that my game supports all 200+ buttons, from all input systems, and them also being remappable? The answer is an obvious, ashamedly no.
Before we continue, there is something that you need to realize: There are a few things that are not rebindable. These include mouse position, mouse wheel and gamepad analog sticks (axes). This implies, that these have to be accessible, no matter which rebind solution will be actually implemented. But keyboard keys, mouse buttons and gamepad buttons are all either pressed down or released. Thus, they can easily be rebound to each other. Since the SDL2 mouse has a method to retrieve the entire button state as a single unsigned 32-bit int (u32), where each bit represents one button, I decided that all buttons I ever need fit into a u32. Thus, my keyboard, mouse and gamepad implementation all expose a single u32, that indicates their current button state.
"Hold on a second!" you may ask, "Doesn't a keyboard have more than 32 keys?" Yes, you are correct. But remember 2 paragraphs ago that I don't need that many buttons to play my game. The keyboard will eventually expose all its keys, which I'll implement the moment I require text input into the game, but only 32 of the keys will be sent to the rebind system. Thus, we only need 4 rebind matrices: keyboard to keymask, keymask to general, mouse to general, and gamepad to general. And because every control system exposes the same u32, and the output is the same, 3 of these 4 rebind matrices can use the same logic.
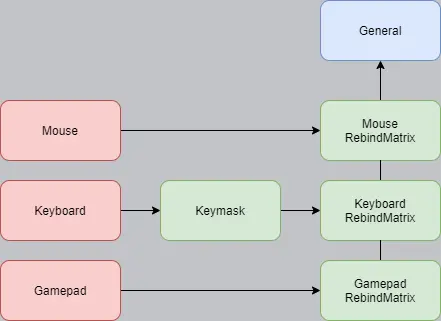
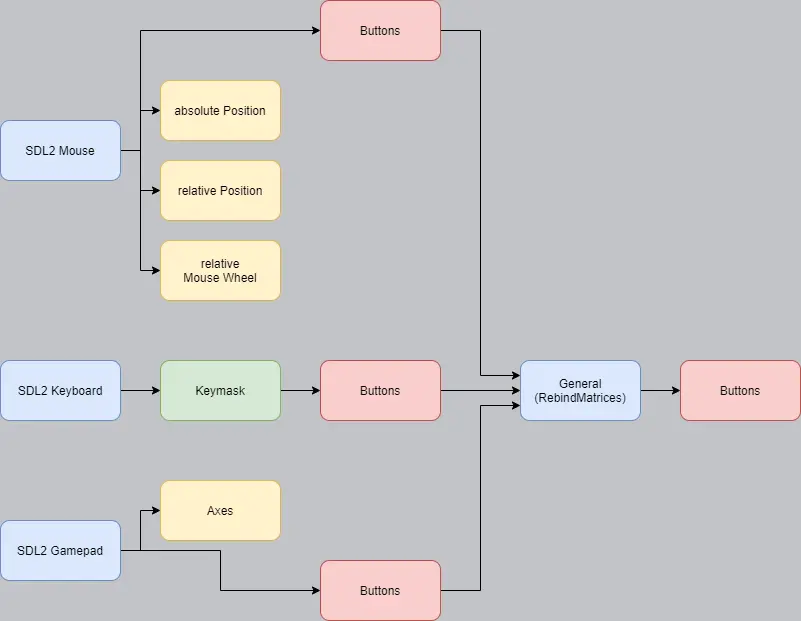
Above is a diagram of the RebindMatrices. And below is a diagram of each input system, the values they expose, and how the data flows.
Coding Keymasks and Buttons
I will now be starting to talk code. I am currently writing my engine in Rust, so some basic knowledge about Rust syntax may be helpful for you, the reader. Other than the bitwise logic, I won't use complicated stuff. So even if you have limited Rust experience, if you have some programming experience, I think you can follow along.
Let's start with the keyboard keymask. The keymask routes a scancode to a button. A scancode is what SDL2 uses to identify a key on a keyboard. The type of a keymask is [Scancode; 32], which is simply an array of 32 scancodes. Consider the following example: The scancode for the A key is stored at index 13 in the array. That means, if the user presses the A-key, the keymask will set the 13th bit of the buttons to 1. The code to calculate a given button state from a keymask looks like this:
impl Keyboard {

    pub fn update_state(&mut self, keyboard_state: sdl2::keyboard::KeyboardState) {

        let mut new_state = 0;


        for (scancode, value) in keyboard_state.scancodes() { //🅐

            if !value { //🅑

                continue;

            }


            for i in 0..32 { //🅒

                if self.keymask[i] == scancode { //🅓

                    new_state |= 1 << i; //🅔

                }

            }

        }


        self.buttons.update(&new_state); //🅕

    }

}
We iterate over the entire keyboard_state 🅐. If the scancode is not pressed down 🅑, the bit can stay 0 and we can continue to the next scancode. Then we iterate over self.keymask 🅒. If the keymask contains the scancode 🅓, the according bit in the new_state will be set to 1 🅔. After all iterations, buttons will be updated 🅕. More on 🅕 in an upcoming blogpost. I came up with a neat trick to easily compute button down, button up and button hold 😉
The mouse is quite a bit easier:
// somewhere in impl Mouse

pub fn update_state(&mut self, mouse_state: sdl2::mouse::MouseState) {

    let new_state = mouse_state.to_sdl_state();

    self.buttons.update(&new_state);

}
We simply get the SDL2 state, change it to a u32 and then update its buttons. That's literally it. The gamepad is more complicated than the mouse, but compared to the keyboard it's a cakewalk:
// somewhere in gamepad.rs

// called by the gamepads update function

fn get_button_state(game_controller: &GameController) -> u32 {

    let mut new_state = 0;

    for (i, button) in ALL_BUTTONS.iter().enumerate() { //🅐

        if game_controller.button(*button) { //🅑

            new_state |= 1 << i; //🅒

        }

    }


    new_state //🅓

}
ALL_BUTTONS is a static array, which includes all gamepad buttons, and we simply iterate over it 🅐. If it is pressed down 🅑, we set the according bit to 1 🅒. Then we return new_state 🅓, so that the calling function can update the buttons afterwards.
Coding the RebindMatrix
Now that we have all the theory and preparation out of our way, we can finally implement the RebindMatrix. Are you ready? Let's do this:
The general input system is simply a fourth one, beside mouse, keyboard and gamepad. However, it references the buttons of the other systems, such that it can generate a single button state from them. The type of RebindMatrix is simply [u32; 32], meaning an array of 32 unsigned 32 bit integers. The entire rebind logic is simply this:
impl General {

    pub fn update_state(&mut self, mouse: &Buttons, keyboard: &Buttons, gamepad: &Buttons) {

        let rebound_mouse =

            rebind(mouse, &self.rebind_matrix_mouse); //🅐

        let rebound_keyboard =

            rebind(keyboard, &self.rebind_matrix_keyboard); //🅑

        let rebound_gamepad =

            rebind(gamepad, &self.rebind_matrix_gamepad); //🅒


        let new_state = rebound_mouse | rebound_keyboard | rebound_gamepad; //🅓


        self.buttons.update(&new_state); //🅔

    }

}


fn rebind(buttons: &Buttons, rebind_matrix: &RebindMatrix) -> u32 {

    let mut result = 0;

    let mut bitset = buttons.hold();


    while bitset != 0 {

        let bit = bitset & (!bitset + 1); //🅕

        let index = bit.trailing_zeros() as usize;


        let mask = rebind_matrix[index]; //🅖

        result |= mask; //🅗


        bitset ^= bit; //🅕

    }


    result //🅘

}
First, we apply the RebindMatrix of mouse 🅐, keyboard 🅑, and gamepad 🅒, to rebind their inputs. Then we simply bitwise-OR them together 🅓 and update our button state 🅔. To apply a rebind matrix, I use the trick that I learned in this blogpost. Essentially, the while loop and the bit magic 🅕 allow me to iterate through all bits that are set to 1, with their respective indices. For example, 0b00101001 would fire 3 times, at index 0, 3 and 5. Then I simply take the row of the rebind matrix at that index 🅖, and apply it to the result 🅗. And then finally, we return the resulted output 🅘, such that update_state() can use it further.
Conclusion
Phew, that was quite a mouthful. But as you saw in the code, it isn't that much, honestly. You just need some further boilerplate code around it, to make it work in your game, but you should now be well equipped to implement your own rebind system in your game.
But was it worth it? Well, if I remove the sleep statement with this implementation, I get about 9000 to 10000 fps, which is way above what I consider acceptable. But not only is performance acceptable, its usability is insane. If you are handicapped for example and have difficulties pressing multiple buttons at once, you can now easily map a single button to multiple others. You can also map different buttons to the same action if you want. And as a developer, I also got quite the utility out of it: Since each RebindMatrix is simply an array of integers, I can hotswap them at runtime. For example, if I want to disable the "jump" button for any reason, I can just set the according column of the matrix to 0, and change it back to the user setting, to enable it again.
All in all, I am quite happy with it, and I hope you find this useful in any way 😊
|
| ◀ | Previous Post: Post Crisis |
| ▶ | Other Writeups |