PHP, Databases and how my Blog works
Programming · Apr 25th, 2021
If you have come this far in my blogpost, I have to admit that I lied. In the last chapter I said you only need HTML, CSS and JavaScript to display a website, but there is actually a lot more to it. If you are still here, then there is one deceptively complicated question left: What if you want to dynamically change the HTML that is send to the browser? For example, you are reading this article on the Article page. And depending on what id is entered in the URL, a different HTML is displayed. Crazy! Then there is my blog. I didn't hardcode the selection of projects and posts into the HTML. As a matter of fact, the data lies in a database, and the HTML is dynamically created, depending on what is actually stored in the database. And then there is my Newsletter and Contact form.
That's a lot of stuff which I still haven't covered, and the painful truth is, HTML, CSS and JavaScript are absolutely not capable of implementing these things. What we need, is some sort of backend which generates an HTML, before it is send to the users' browser.
There are many ways to implement a backend. I chose PHP, because it was just plug and play and it worked on the spot. If you believe what Reddit tells you, then PHP is the most horrendous programming language ever conceived. My opinion? I don't mind it. Sure, it has some inconsistencies and is poorly designed, but like with any programming language, you face obstacles which you need to overcome. With Node and Ruby and whatever, you need to install extra stuff. For PHP I just needed to make a PHP file and it just works.
PHP
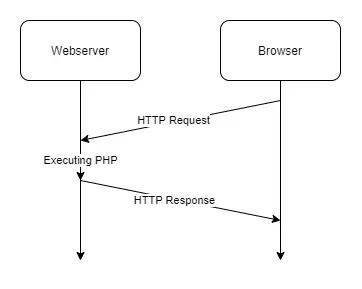
So what actually is PHP? PHP stands for Hypertext Preprocessor (it's actually a backronym, previously it meant “Personal Home Page Tools”) and it exactly solves the problem which I mentioned in the intro of this chapter: When the user requests a PHP file, the webserver runs the code of the PHP file and spits out an HTML, which is then send to the user.

During the execution of the PHP file, you can do whatever you want. You can handle the request, talk to a database, and generate an HTML. Below is a simple PHP code example:
<?php

    echo “<h1>Hello World</h1>”;

?>
echo is the command, which spits out HTML. After running that file, you simply get:
<h1>Hello World</h1>
Pretty easy. The cool thing about PHP is, that you write it just like regular HTML, except where you want backend code to be executed. You simply need to insert a <?php?> tag and that's it. The PHP tag can be inserted EVERYWHERE, meaning you can not only create HTML tags, but just any string you can imagine.
Take for example the actual source code of my blog-page:
<?php


$article_type_id = 0;


include 'secret/secret.php';

include 'php/articles_database.php';

include 'php/util.php';


echo_head();


?>


    <title>Blog</title>

    <meta name="description" content="Blog of Simon Sutoris">

    <meta name="keywords" content="blog">


    <meta name="robots" content="all">


    <meta property="og:title" content="Blog" />

    <meta property="og:type" content="website" />

    <meta property="og:url" content="https://www.rismosch.com/blog" />

    <meta property="og:image" content="https://www.rismosch.com/assets/meta_image_x10.png" />


    <meta name="author" content="Simon Sutoris">


</head>

<body>

    <div class="background">

        <?php

            echo_banner();

            echo_selector(1);

        ?>


        <div class="content" id="content">

            <h1>Blog</h1>

            <?php

                $dbSelectConnection = mysqli_connect($dbHost, $dbSelectUsername, $dbSelectPassword, $dbName);


                if($dbSelectConnection){


                    $pageName = "blog";

                    printDropdown($dbSelectConnection, $pageName);

                    printArticles($dbSelectConnection, $pageName);

                    printSelector($dbSelectConnection, $pageName);


                }

                else{

                    echo "<h1>:(</h1><p>Error while loading articles.</p>";

                }

            ?>

        </div>


        <?php echo_foot(false); ?>

    </div>

</body>

</html>
So this looks quite different from the HTML which will be displayed in your browser, but it is apparent that the site is dynamically created. So let's talk about what this code is actually doing. The echo_x() methods should be fairly self-explanatory: They echo the specific part of the HTML. All my pages contain a similar header. Also, the banner, selector and foot links are pretty much always the same. Implementing the same thing on every page is a pain in the butt, because if I want to make changes to the banner for example, I need to change it in every single file. It's easier if I have one PHP file, which contains the method to print the banner, so that I can change the banner in just one file.
The methods differ a little bit from each other, for example the banner and the header take no inputs, the echo_selector($active_tab) method takes an int, to know what selector tab needs to be active. The echo_foot($uses_captcha) takes a bool, which displaces the “back to top” button, when reCAPTCHA is used. You may know that if a site uses reCAPTCHA, a small UI window in the bottom right is displayed. I don't want that overlapping with the button, so I displace the button. More to reCAPTCHA in a following chapter.
And this is basically it. Once you wrap your head around it, PHP is actually very simple. If you take a look at my util.php code, you will find the code you expect: Just simple echoes which echo the specific HTML. Nothing special.
Databases
Okay, so now that we understand what PHP is and how to use it, let's talk about how I used it to make the blog on my website. Here's the main idea: No matter how many blogposts I will create, the surrounding website will always look the same. Wouldn't it be nice if we could store the individual blogposts somewhere, and then use PHP to display them on our page?
Yes, that would be nice. The solution to this answer is simply a database. A database is an organized storing system, that stores data efficiently, consistently and persistently. While there are other storing systems that may also work for a blog, like using a file, a database has a fundamental advantage: As a client, I can get exactly the data that I specify. Why this is such an advantage, we'll see in a moment. But first it may be a good idea to explain how a database actually works.
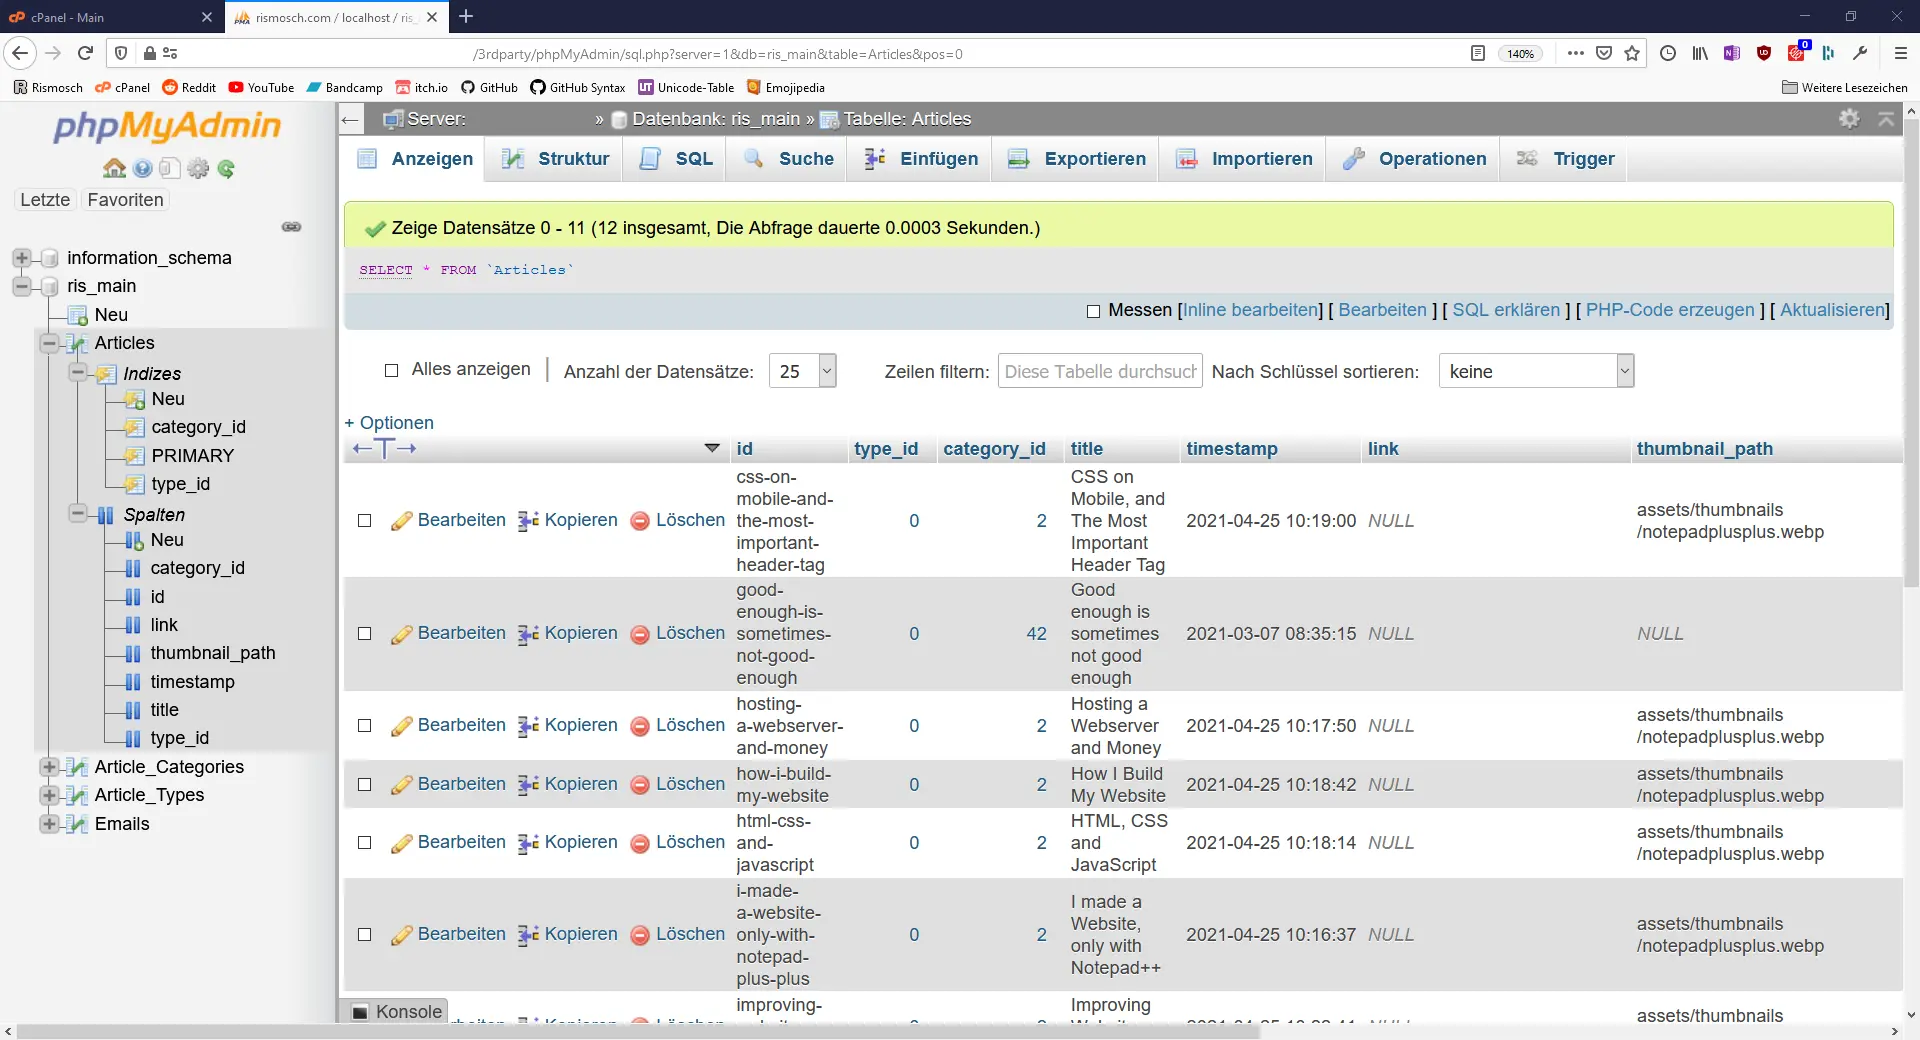
A database stores data in tables. A table is defined by its columns. A data entry is a simply a row in such a table. A table usually contains a key, which uniquely identifies a row. In most cases, such a key is simply an id. Here's an example how the articles table looks like in my database:

You may notice, that this table doesn't directly store its type (blog/project) or category (music, blog, etc.). Instead it stores an id of the specific column. The actual types and categories are stored in a separate table. This is to make usage easier and more importantly to reduce redundance. Storing the same data multiple times may eat a lot of space. So by storing it in a separate table, every entry will be stored only once, and then only the id needs to be referenced. Such ids which are referenced by another table, are called foreign keys.
So in a nutshell, a database is just a complicated way to store stuff. Great. Now after storing stuff in a database, you somehow need to retrieve it. This can be done with a language called SQL. SQL stands for Structured Query Language and it is the main way that you will talk to your database. Consider the following SQL statement:
SELECT * FROM Articles
This statement retrieves all data from the table Articles. So this pretty much results into the screenshot I have posted above. But things get a little bit more exciting when we add conditions:
SELECT * FROM Articles WHERE id='good-enough-is-sometimes-not-good-enough'
This only retrieves the rows, with the id of "good-enough-is-sometimes-not-good-enough". Since the id is unique, only one row will be returned: The gamejam that broke me. With further conditions we can combine tables, sort them or only retrieve a small section of the entire database. Definitely the most complicated SQL statement which I use on my website is this:
SELECT

    Articles.id AS id,

    Article_Types.name AS type,

    Article_Categories.name AS category,

    Articles.title AS title,

    Articles.timestamp AS timestamp,

    Articles.link AS link,

    Articles.thumbnail_path AS thumbnail_path

FROM

    Articles,

    Article_Categories,

    Article_Types

WHERE

    Articles.category_id = Article_Categories.id AND

    Articles.type_id = Article_Types.id AND

    Articles.type_id = 0

ORDER BY

    Articles.timestamp DESC

LIMIT

    0,

    10
I select from 3 tables: Articles, Article_Categories and Article_Types. With the first two WHERE-statements, I make sure that each row only appears once and correct. With ORDER BY I order them from newest to oldest. With LIMIT I specify to only get 10 results and finally with SELECT I select all columns that I actually want to use.
Why do we do that complicated stuff again? Because the conditions allow us to filter the data. For example by changing the LIMIT, I can display more or less blogposts on my site. By changing the third condition “Articles.type_id = 0” I can either display blogs or projects. I can even add another condition to only filter for music, or programming, or whatever. This filtering is super powerful, which is the main reason why I am using a database.
Now that we understand that, we need to implement this into PHP:
// connect to database

$dbConn = mysqli_connect($dbHost, $dbUsername, $dbPassword, $dbName);


// test if connection is successful

if($dbConn)

{

    // execute sql query and get the total amount of rows

    $result = mysqli_query($dbConn,$sql);

    $numRows = mysqli_num_rows($result);


    if($numRows > 0)

    {

        // fetch the result

        while($row = mysqli_fetch_assoc($result))

        {

            // do stuff with each row

            echo $row['id'] . " " . $row['title'] . "<br>";

        }

    }

}
This code connects to a database, then if the connection is successful, executes the query, and then fetches each row and finally simply prints the data of each row. $sql is the SQL which I explained before. As you see $row is simply an array with the column names as keys. With this, you can then use the data however you like. You can put it in a list, or table, or generate links. You can really do whatever with your data.
Now that you are a bit better equipped to understand PHP and SQL, you can take a look at my PHP code for various files again and see, that it's just a blown-up case of the code above, just with HTML and CSS to make everything look nice.
part of blog.php
<div class="content" id="content">

    <h1>Blog</h1>

    <?php

        $dbSelectConnection = mysqli_connect($dbHost, $dbSelectUsername, $dbSelectPassword, $dbName);


        if($dbSelectConnection){


            $pageName = "blog";

            printDropdown($dbSelectConnection, $pageName);

            printArticles($dbSelectConnection, $pageName);

            printSelector($dbSelectConnection, $pageName);


        }

        else{

            echo "<h1>:(</h1><p>Error while loading articles.</p>";

        }

    ?>

</div>
part of php/articles_database.php
function printArticles($dbConn, $pageName)
{
global
$categoryFilterString,
$show,
$offset,
$article_type_id;
$sqlArticles = "
SELECT
Articles.id AS id,
Article_Types.name AS type,
Article_Categories.name AS category,
Articles.title AS title,
Articles.timestamp AS timestamp,
Articles.link AS link,
Articles.thumbnail_path AS thumbnail_path
FROM
Articles,
Article_Categories,
Article_Types
WHERE
Articles.category_id = Article_Categories.id AND
Articles.type_id = Article_Types.id AND
Articles.type_id = {$article_type_id} AND
{$categoryFilterString}
ORDER BY
Articles.timestamp DESC
LIMIT
{$offset},
{$show}
";
$result = mysqli_query($dbConn,$sqlArticles);
$numRows = mysqli_num_rows($result);
$totalRowsResult = mysqli_query($dbConn,"SELECT COUNT(id) as count FROM Articles WHERE type_id={$article_type_id} AND {$categoryFilterString}");
$row = mysqli_fetch_assoc($totalRowsResult);
echo "{$numRows} of total {$row['count']} posts</p>";
if($numRows > 0)
{
echo "
<table style=\"width: 100%;\">
<tr class=\"row_empty\"><td></td></tr>
<tr class=\"row_empty row_devider\"><td></td></tr>
";
while($row = mysqli_fetch_assoc($result))
{
$timestamp = strtotime($row['timestamp']);
$newTimestampFormat = date('M jS, Y',$timestamp);
if(!is_null($row['link']))
$link = $row['link'];
else
$link = "https://www.rismosch.com/article?id={$row['id']}";
$thumbnail = GetThumbnailPath($row);
echo
"<tr><td><a title=\"{$row['title']}\" href=\"{$link}\" class=\"articles_entry_link\">
<div class=\"articles_mobile\">
<table class=\"articles_entry\">
<tr>
<td>
<div class=\"articles_thumbnail_wrapper_outside\">
<div class=\"articles_thumbnail_wrapper_inside\">
"; late_image($thumbnail, "articles_thumbnail", ""); echo "
</div>
</div>
</td>
</tr>
<tr>
<td>
<div class=\"articles_thumbnail_information\">
<h3>{$row['title']}</h3>
<p>{$row['category']} · {$newTimestampFormat}</p>
</div>
</td>
</tr>
</table>
</div>
<div class=\"articles_desktop\">
<table class=\"articles_entry\">
<tr>
<td class=\"articles_thumbnail_row_desktop\">
<div class=\"articles_thumbnail_wrapper\">
"; late_image($thumbnail, "articles_thumbnail", ""); echo "
</div>
</td>
<td>
<div class=\"articles_thumbnail_information\">
<h3>{$row['title']}</h3>
<br>
<p>{$row['category']} · {$newTimestampFormat}</p>
</div>
</td>
</tr>
</table>
</div>
</a></td></tr>
<tr class=\"row_empty\"><td></td></tr>
<tr class=\"row_empty row_devider\"><td></td></tr>
";
}
echo "
</table>
";
}
else
{
echo "<p>no articles found ¯\_(ツ)_/¯</p>";
}
}
article.php
Now we got an article selection, cool. But how do I actually display an article? Well, glad you ask. Just like with the other PHP files, the container around the article is always the same, just the content changes. Each article has a title, a date, links to the next and previous posts, and a comment section. How to change these things and what content to display is handled by one PHP file, the aforementioned database and a file system.
When you access article.php, it gets the URL parameter “id”. The “id” of this very post is “php-databases-and-how-my-blog-works”. With SQL it retrieves the correct row of the article table. In the row I get the title of the post, its timestamp and its category. Then with the timestamp, I gather the article with the next highest and next lowest timestamp, thus retrieving the next and previous post.
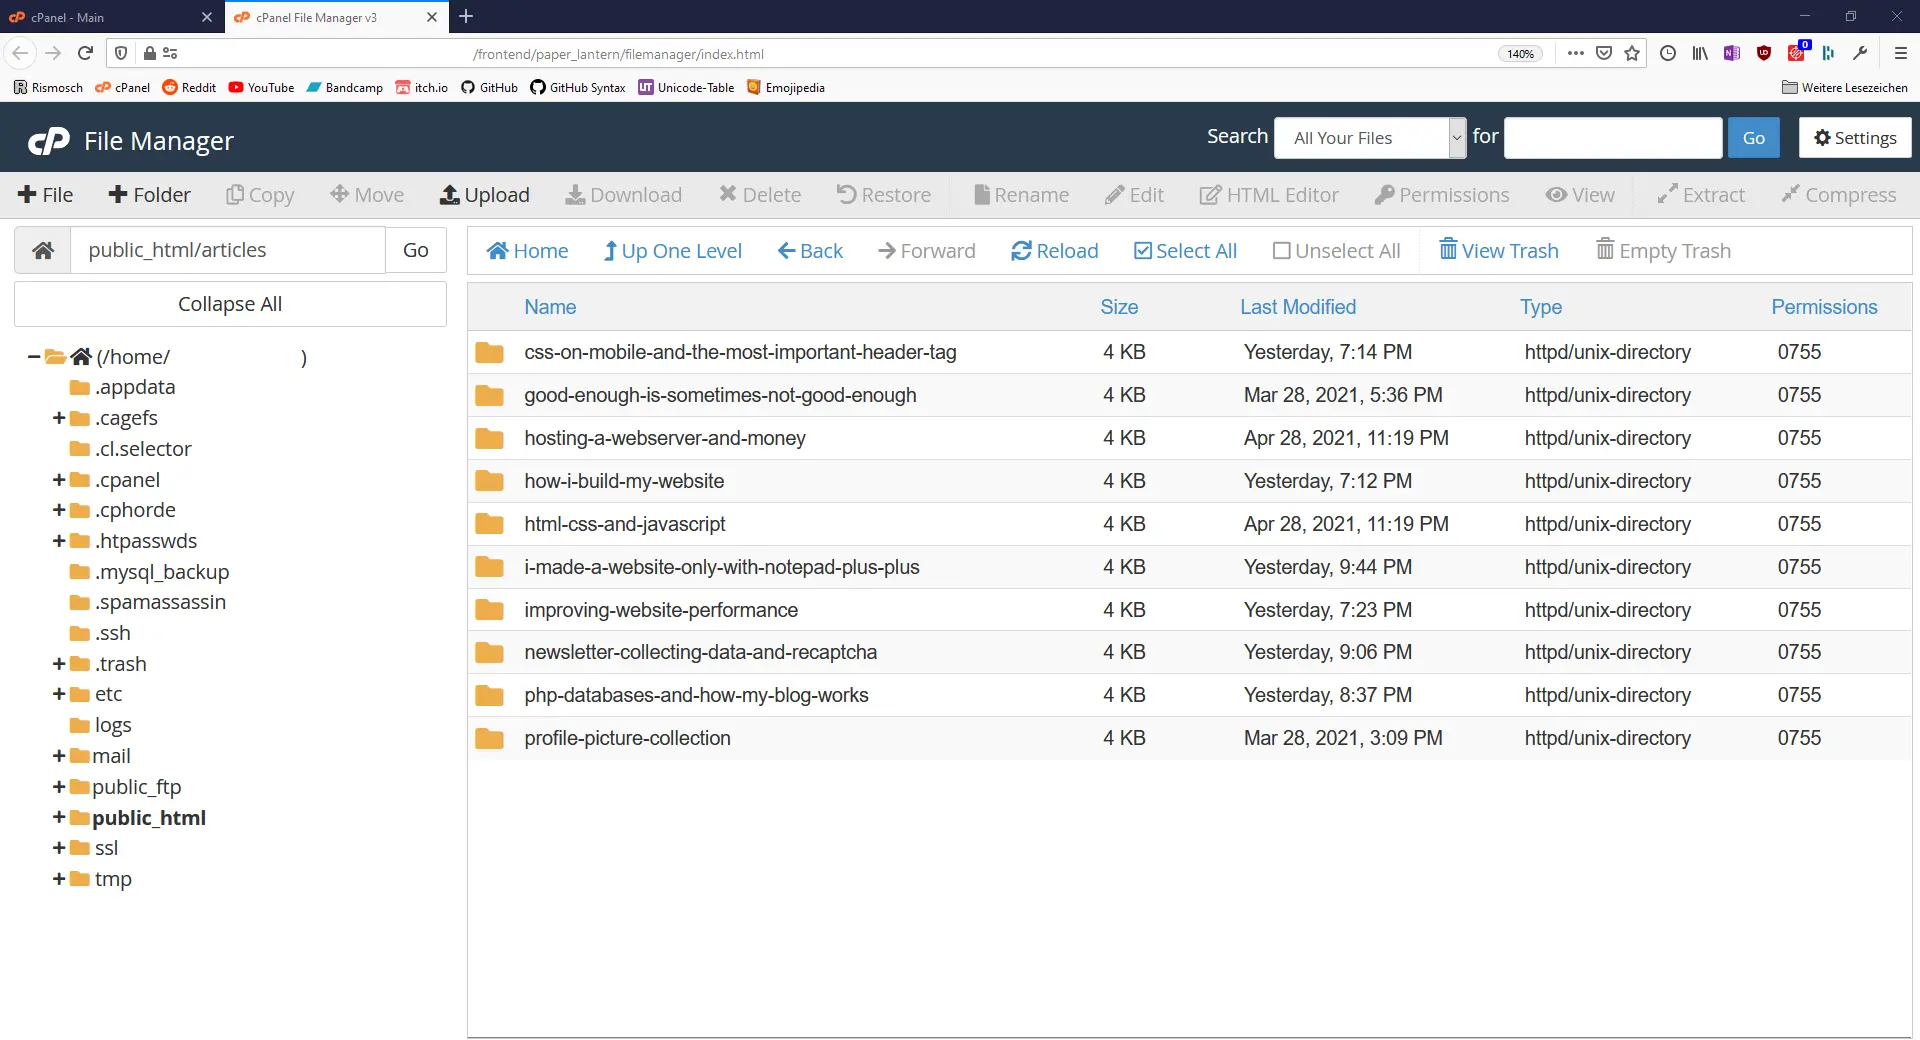
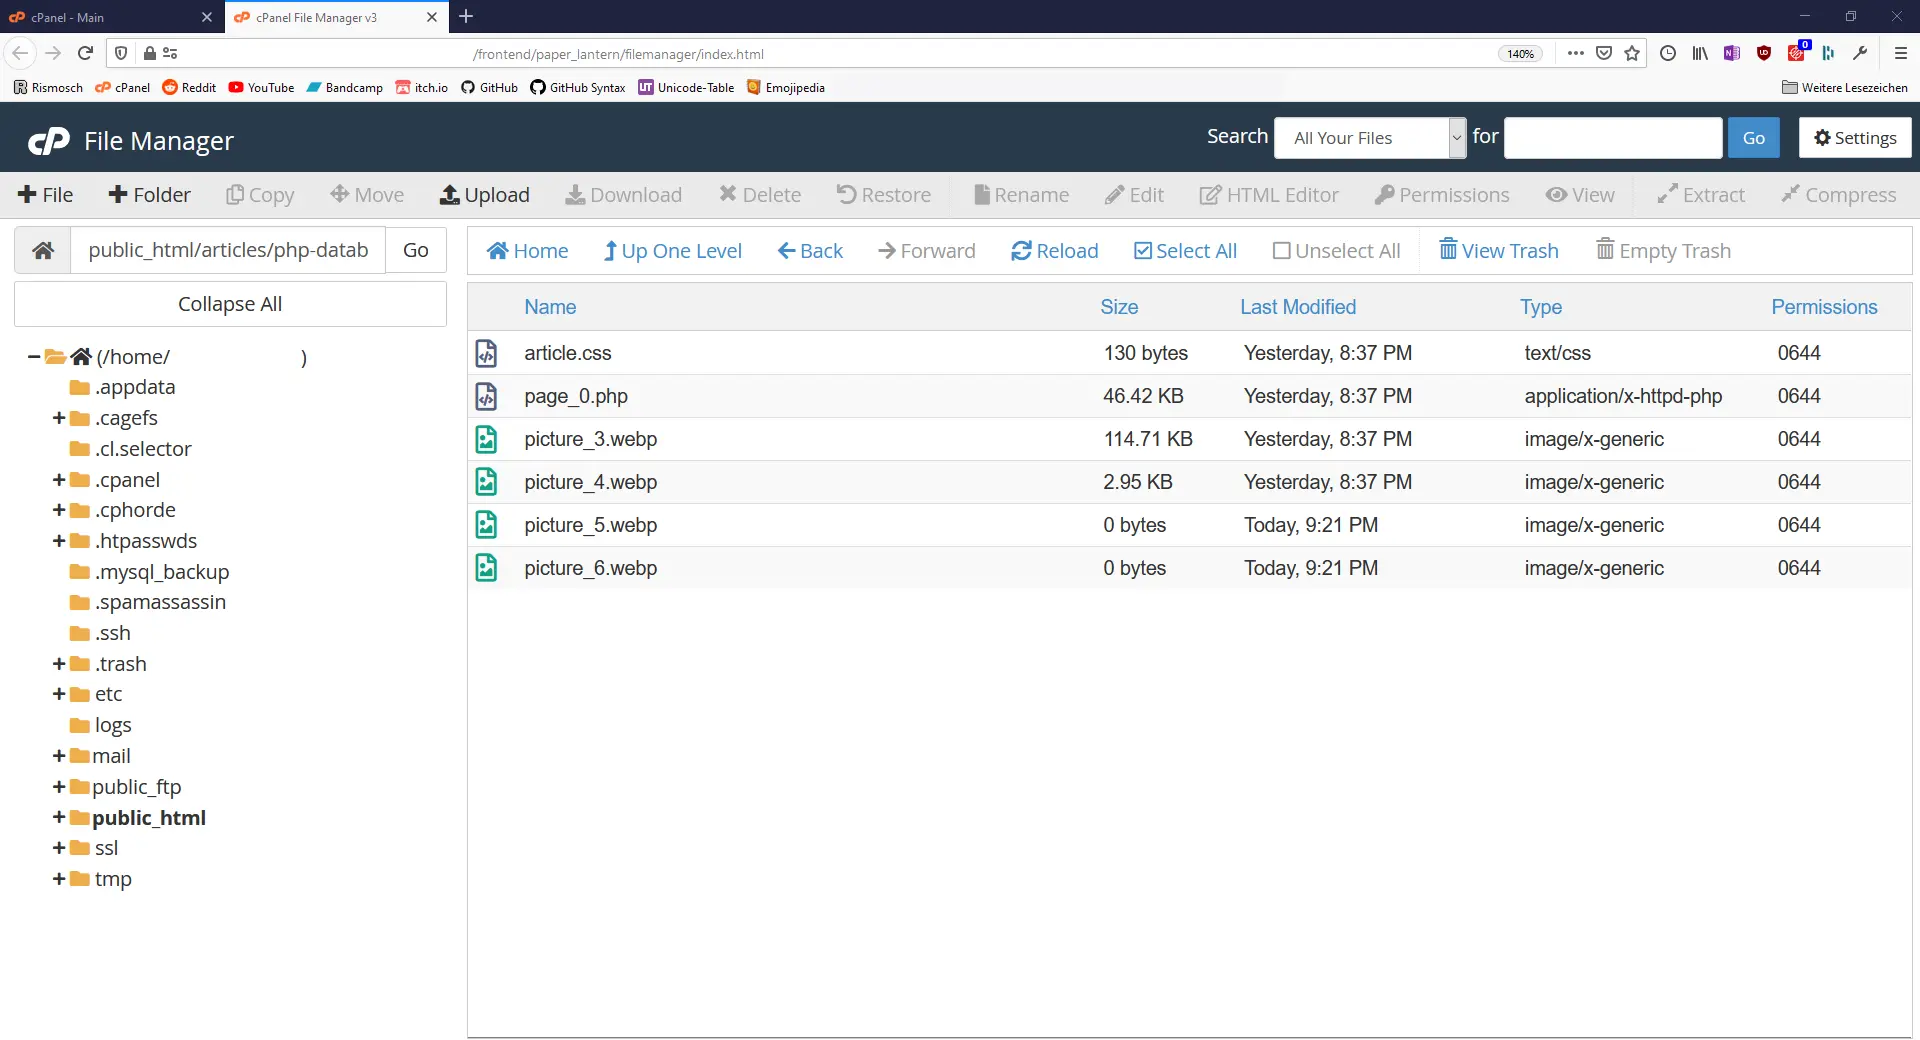
All of this will simply be displayed around the article. I have a directory “articles”, which contains contents of each blog. It gets the directory, which has the same name as the id of the post and checks if it contains a file called page_0.php. If it contains this file, then it will simply be included, thus its content being displayed on the page. If article.css exists, it will be included. This allows me to have individual CSS for every article. Finally, article.php contains a method, which allows page_0.php to easily access assets, like pictures and other files.
Putting everything together, it looks like this:

This is the articles-directory, which contains all articles.

These are the files for this very post.
The method to access an asset looks like this:
function get_source($file)

{

    global $article_id;


    return "https://www.rismosch.com/articles/{$article_id}/{$file}";

}
And it is easily called like this:
<?php late_image(get_source("picture_1.webp"),"","max-width:100%; margin:auto; display:block;"); ?>
More on late_image() in a later chapter.
And that is basically everything regarding my blog. From it's PHP, how each article is stored in the database, how it is build up with multiple files, and how an article is actually displayed.
|
| ◀ | Previous Post: CSS on Mobile, and The Most Important Header Tag |
| ▶ | More Programming related Posts |
